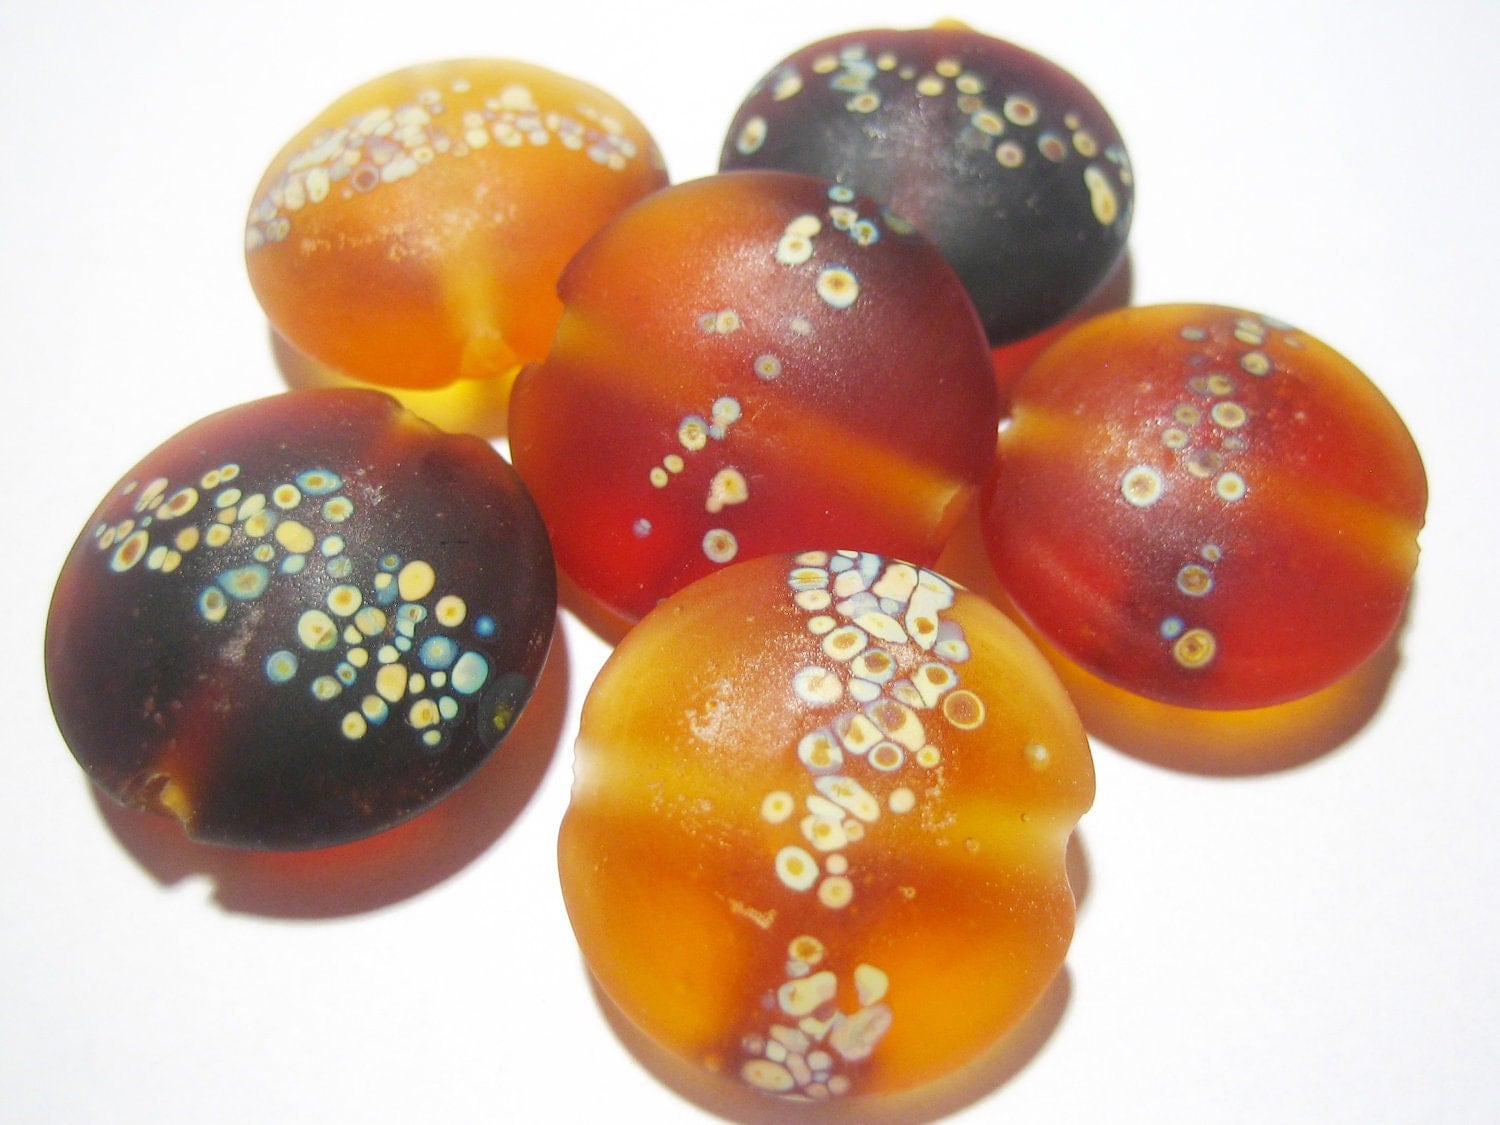
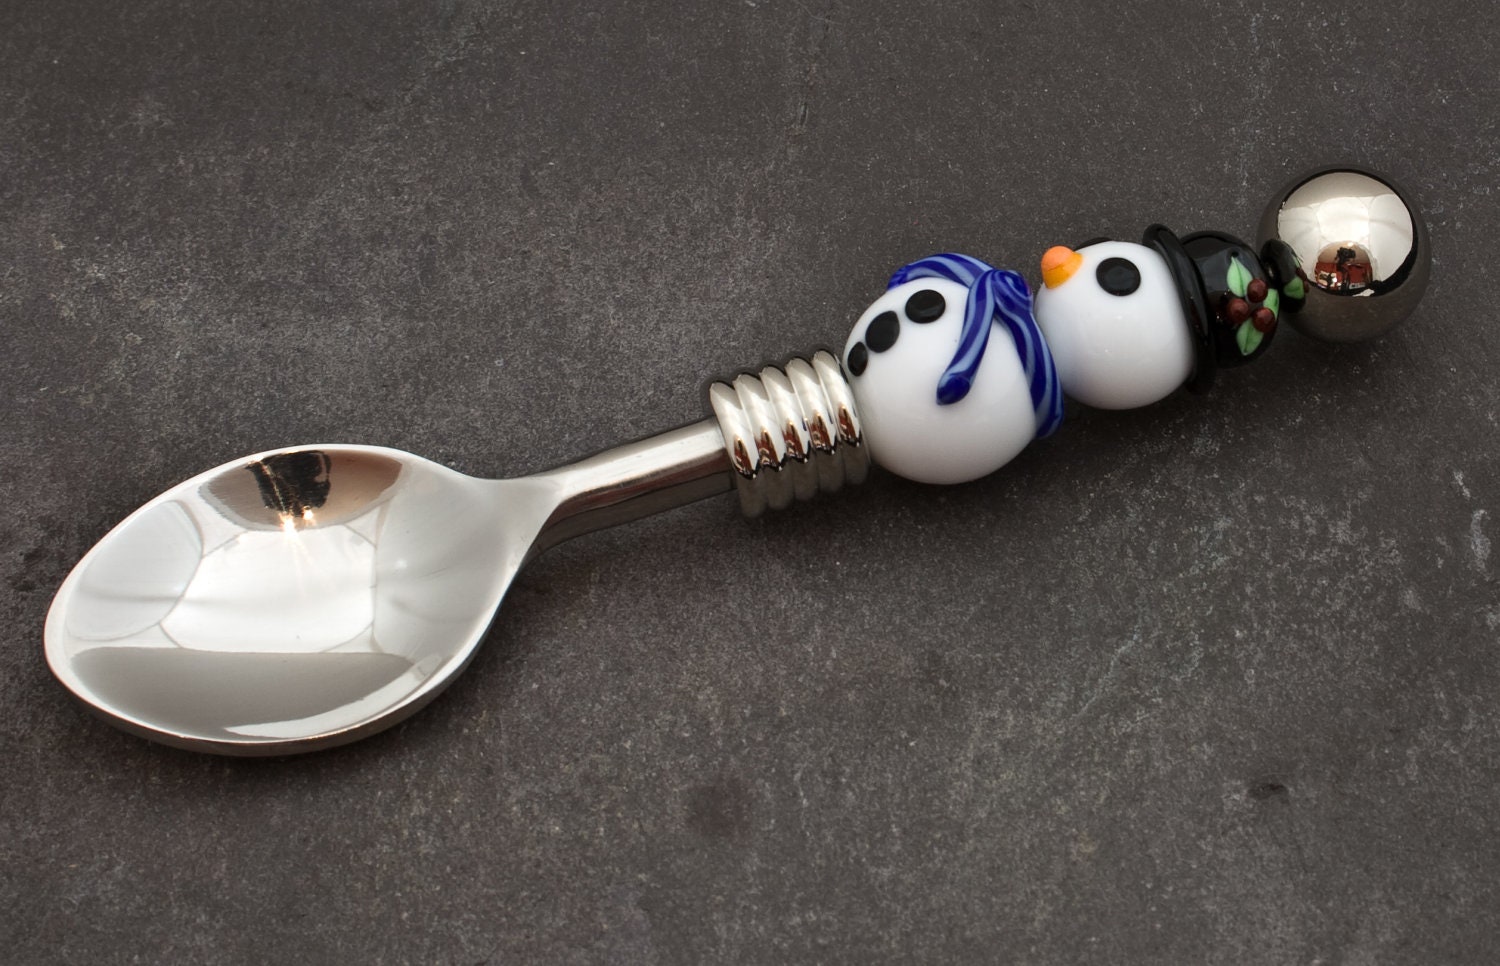
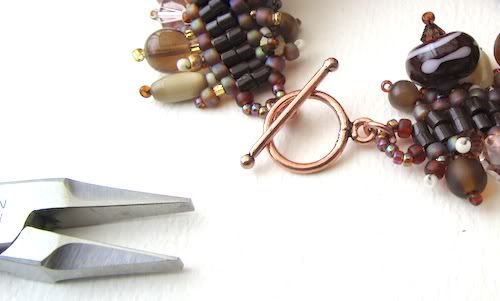
A wonderful team treasury with and autumnal feel.
There is something in the air
Thursday, 25 October 2012
Thursday, 18 October 2012
Halloween is coming and now is the time to get ready for a night of trick or treating!!!
FritNchips has some wonderful Murrini I love the pumpkins and bats!!
Or how about some wonderful beads from Beadsbycat
These wonderful and colourful skull beads are perfect to make into your own jewellery.
or if you are in a hurry the finished article from MadelineBunnyan
Perfect little raven earrings.
But for me its all about bats and this one is perfect!!
Wednesday, 17 October 2012
Well the summer has left us, or missed us, I'm not sure which, but now the colours are changing in the trees and there is a distinct chill in the air. A time to start to pre-pair for winter and of course Christmas (Sorry I know its only October but we do have to think ahead)
Autumn Time
Autumn Time
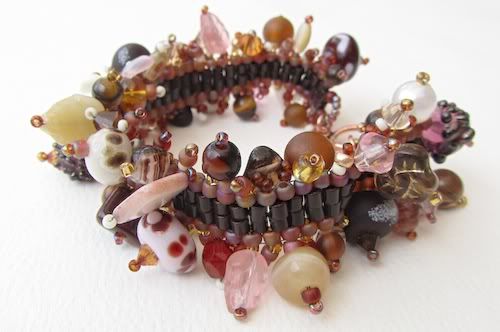
A tempting selection of Autumn tones for your winter wardrobe!!
Our members are all working away to create our selections of beads and jewellery ready for Christmas so remember if you want to give quality and buy handmade don't leave it to the last minute or you may be disappointed!!
Wednesday, 1 August 2012
July Giveaway Winner
A big thank you to Heather of Heather Kelly Glass
Our random number generator picked out lucky number 8 and our July winner is Stephanie Gough with the 8th comment on our July giveaway post. Congratulations Stephanie.
On a side note, after being unsuccessful in numerous attempts over the course of July to contact our June winner I have redrawn and so congratulations also to Lisa Lodge of Pine Ridge Treasures.
Ladies and Gents, if you are entering one of our giveaways by leaving a comment but are not logged in to a blogger or active google+ account please can you leave us information on how to get in touch. Either your email in the form myname at mydomain dot com or your twitter name in the form @mytwittername or alternatively if you are a member of Frit Happens Forum please leave us your forum name too.
Thanks, Jolene.
Tuesday, 10 July 2012
Meet the team part 10
Hearts galore from FHFteam, this post focuses (yup you have guessed it) on heart beads. My chosen trio of hearts on showcase today are all ready to wear too.....
Yum! the colour and texture in this sculpted heart bead necklace are just delicious. This bead has been created by Shahlaa of All that Sparkles. Shahlaa also makes special fun bosom buddies sculptural beads which help to raise funds for Cancer Research UK.
The colours in this super heart shaped pendant necklace speak to me, so pretty. This wonderful heart necklace has been created by Sue in her home studio in North Somerset. Alongside lampwork and jewellery design Sue is also a talented textile artist with a range of silk and velvet scarves in her Etsy shop.
Jeannie lives and works in the beautiful town of St.Ives in Cornwall. She stocks a large range of pretty jewellery all made with her own lampwork beads and very beautiful vessel/perfume bottle pendants. Jeannie also make a range of beads and jewellery made from recycled glass and offers a bespoke bead making service from your own special occasion celebratory champagne bottle.
I hope you enjoyed this quick introduction, click the pics to go to Etsy and see more from each of our teamies and also don't forget to stop by and check out our July Giveaway blog post.
Shahlaa of allthatsparklesbeads
| My Wretched Heart Lampwork focal pendant on hand dyed silk ribbon |
Sue of BlueBoxStudio
| Purple Haze - handmade lampwork glass heart necklace mounted |
The colours in this super heart shaped pendant necklace speak to me, so pretty. This wonderful heart necklace has been created by Sue in her home studio in North Somerset. Alongside lampwork and jewellery design Sue is also a talented textile artist with a range of silk and velvet scarves in her Etsy shop.
Jeannie of Jeanniegems
| My Blue Heart Handmade Glass Lampwork Pendant |
I hope you enjoyed this quick introduction, click the pics to go to Etsy and see more from each of our teamies and also don't forget to stop by and check out our July Giveaway blog post.
Tuesday, 3 July 2012
Meet the team part 9
Glass is so versatile and beautiful and there are so many different skills to learn and challenges in using it as a medium. I am going to devote the my next few meet the team posts to FHfteamers who do beautimus things with silverglass.....capturing the shimmer and delicate beauty of silver rich glass is a skill that I admire greatly and don't think I shall ever be able to master
This little bead is one of my favourite team listings ever, so sweet and pretty and
delicate with an enchanting shimmer. Diane's introduction to glass
began with fusing which led to a qualification in 3D design though Lampwork is now her main passion. Diane also makes lovely findings for jewellery making, you can find these and fused pieces for sale on her personal website at www.dilunah.com
| Silver Trail - Silver Cored Big Hole Lampwork Bead |
Pris of DancingwithGlass
I hope you enjoyed this quick introduction, click the pics to go to Etsy and see more from each of our teamies and also don't forget to stop by and check out our July Giveaway blog post.
| Illuminations Heart : Handmade Lampwork focal |
I have had the privilege of seeing Pris's skills grow and her style develop from quite on in her love affair with glass - Pris says it beautifully herself so here is a quote from her personal page on Etsy - Working with soft glass as I do gives me endless possibilities of
colour, texture, depth and detail to use in my designs. I particularly
love the iridescent qualities of silver glass, and the changeable
nature of it.
Jennie of RaspberryRings
| Ornate Pink Barrell |
Jennie make spectacular large focal beads and mini paperweights and bracelet pops and was the featured Artist of the Month over on the forum in June. Jennie has also written a super tutorial for her distinctive swirl beads which you can find on Etsy here
I hope you enjoyed this quick introduction, click the pics to go to Etsy and see more from each of our teamies and also don't forget to stop by and check out our July Giveaway blog post.
Monday, 2 July 2012
Monthly Giveaway July
It's time for another monthly giveaway, we're got another stunning prize up for grabs sponsored by one of our talented team members...
All you have to do to be in with a chance of winning is leave a comment on this post anytime before the end of July (and don't forget to make sure you're following the FHFTeam blog so that I can contact you too!) The winner will be randomly drawn, and announced on the 1st of August
Good luck!
Heather of Heather Kelly Glass
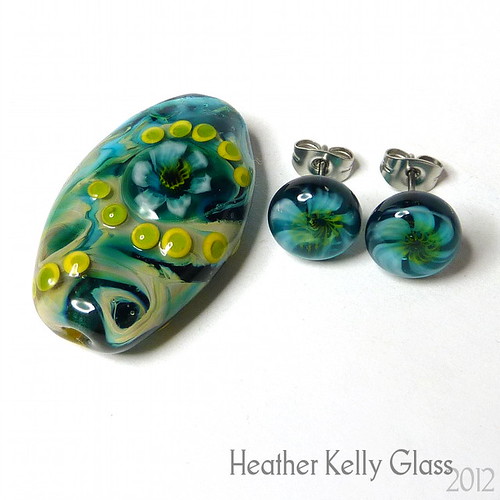
Heather is offering this gorgeous focal bead and matching stud earrings for one of our lucky blog commenters in July.

All you have to do to be in with a chance of winning is leave a comment on this post anytime before the end of July (and don't forget to make sure you're following the FHFTeam blog so that I can contact you too!) The winner will be randomly drawn, and announced on the 1st of August
Good luck!
Sunday, 1 July 2012
June Giveaway Winner
Time to annonce the winner of our June Giveaway sponsored by Sue of BlueBoxStudio
The lucky winner drawn at ramdom from last months blog comp comments is Kathleen Hooper, congratulations Kathleen, this elegant sea glass necklace is yours courtesy of Sue.
Watch this space for news of July's giveaway........ and in the mean time why not check out some of the teams work for sale on Etsy
Watch this space for news of July's giveaway........ and in the mean time why not check out some of the teams work for sale on Etsy
Lynn's Lampies - Bricks and Ladders
Lynn’s Lampies
A regular
spot from team member Lynn Davy, a self-confessed bead addict whose unusual
designs often feature lampwork beads. In this series she shares some of her
secrets and shows you how to use FHFteam’s handmade beads and components in your
own creations!
July 2012
Bricks and Ladders
Buildings are
somewhat on my mind at the moment as we’ll be moving house over the summer…
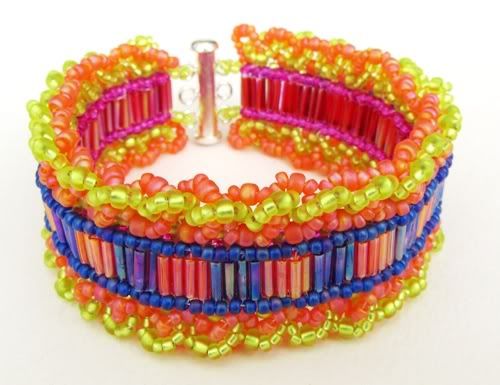
this month’s tutorial will show you a neat way to combine ladder and brick
stitches into a sturdy foundation on which to build a cuff bracelet.
I struggled
for a long time to find a use for ‘double delica’ beads because they have such
huge holes that ‘normal’ sized cylinder beads just disappear up inside them
when you try to combine the different sizes. But they are brilliant for making
ladder-stitched strips because they work up so quickly!
Ladder stitch
is also a good way to use bugle beads, although they are narrower than double
delicas so you need more of them to make a bracelet length. They do give a
lovely texture though…
A ladder more
than two beads wide is a bit prone to gaping between its ‘rungs’. You can widen
it by simply adding fringe (and with holes that size, you can add a LOT of
fringe if you want to!) or by stitching along the edges with brickstitch.
Brickstitch
feels a bit weird to begin with because you don’t actually stitch through any
beads of the previous row, you go under the threads instead; but it’s very
simple really. It’s a versatile way to make lots of different shapes (the
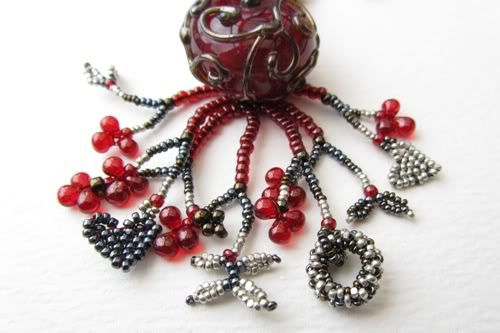
little hearts on this tassel are made with brickstitch)…
… or to bead
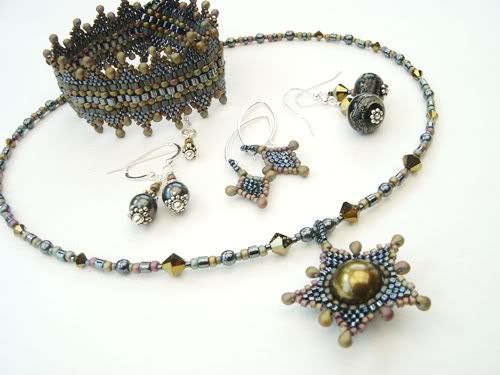
around a larger bead, as in the pendant for this set. (The cuff is made with a
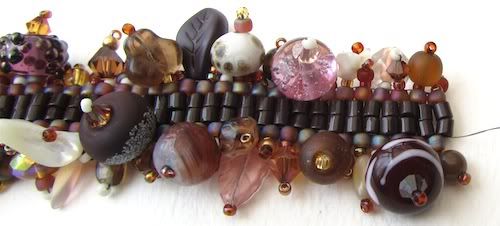
ladder-stitch base and brickstitch edging, too.)
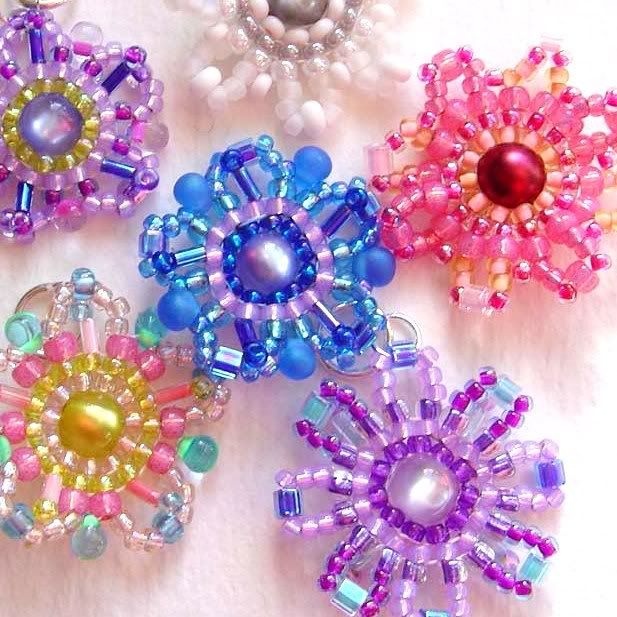
And once
you’ve beaded around a bead, you can add loops and fringes to make flowers…
Brickstitch
does have a weakness, though: the thread ‘bridges’ between the beads are
exposed along the edge of the beadwork. Exposed thread is prone to catching and
fraying, especially in a bracelet, which gets a lot of wear and tear, so it needs
protecting. A great excuse to add more beads!
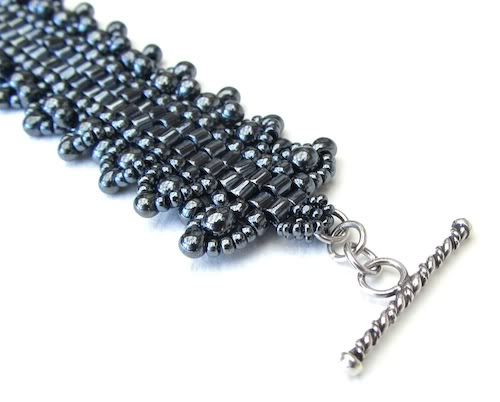
You can add a
simple one-bead ‘picot’ edging (as we did when we made those beaded spacer
beads) between each pair of ‘rungs’. Or you can make a more elaborate, formal
edging.
Or else you
can go mad with lots of beaded fringe. No prizes for guessing which one I’d
choose!
This month’s
project makes use of those little orphan lampies that so many of us have
languishing unloved in our stash boxes, just waiting for someone to pick them
out and give them a good home. And if you don’t have any orphans, search
through the FHFteam’s shops and you’ll find plenty to adopt!
Tutorial: Orphanage Bracelet
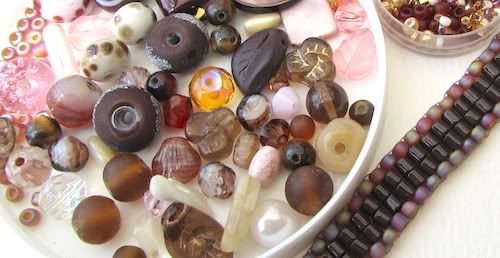
You will
need: ‘double delica’ (size 8 cylinder) beads and size 8 seed beads for the
base, plus half a dozen small ‘orphan’ lampwork beads, a few 4mm crystal
bicones, 30-ish ‘accent’ beads anywhere between 6 and 10 mm in diameter, a
teaspoon of ‘bead soup’ with seed beads in sizes 11 and 8, a couple of jump
rings and a clasp.
You will also
need a beading needle, pliers, scissors, and thread – a tough ‘braided’ thread
such as Fireline or PowerPro is recommended for this one because you’re using
crystals and relatively heavy beads for the embellishment. (If any fringe beads
look wobbly, go through them again once or twice more to stiffen their
resolve.)
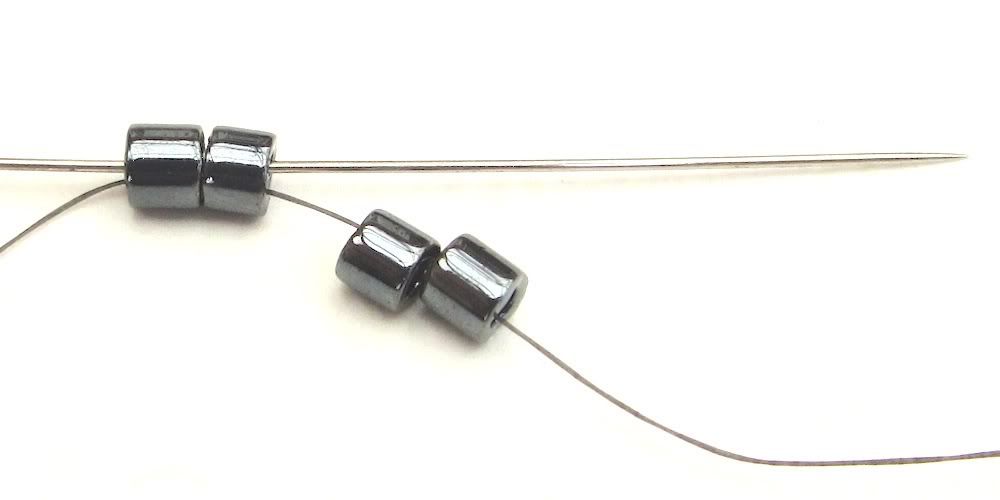
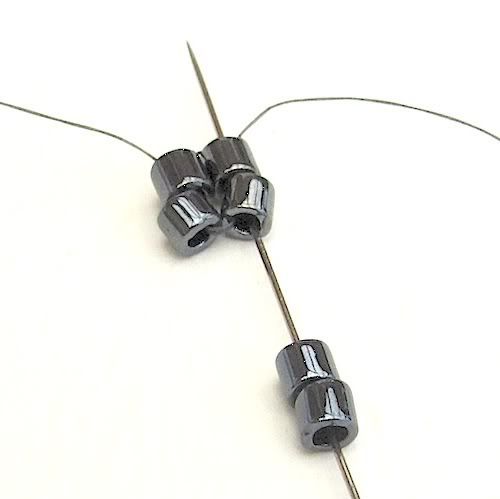
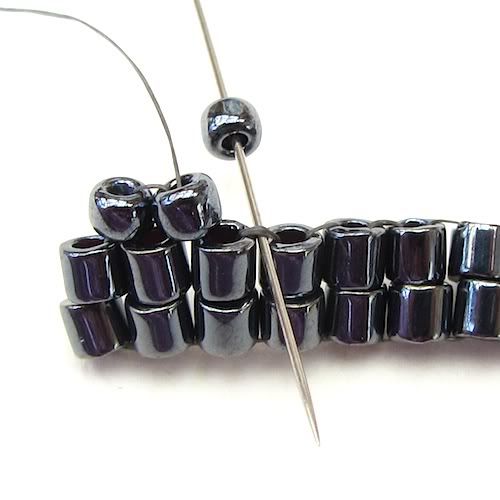
Thread your
needle with no more than two arms’ length of thread and pick up four double
delicas. Go through the first two of them again.
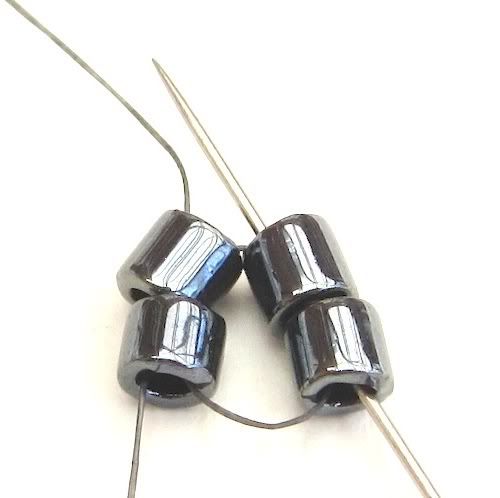
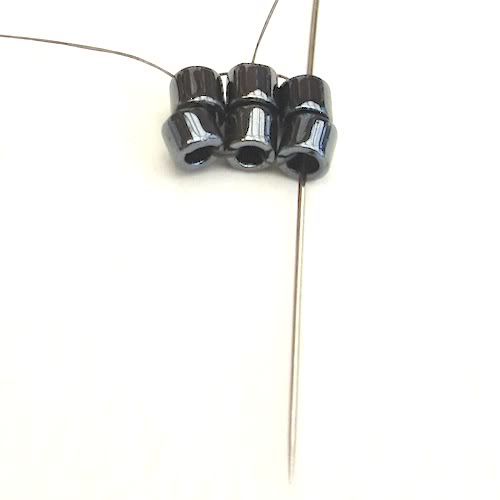
Pull the
thread snug so you have two pairs sitting side by side. These are the first two
‘rungs’ of your ladder.
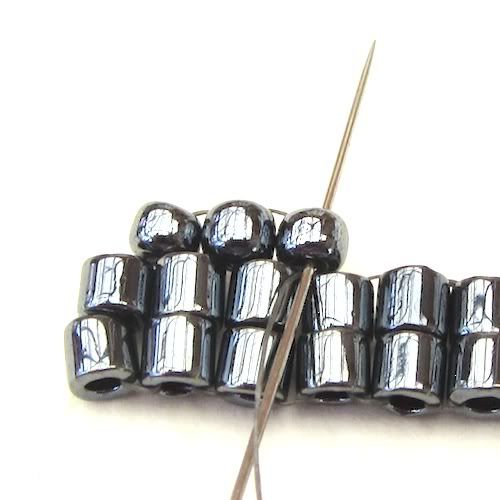
Pick up
another two double delicas and go through the previous ‘rung’ again.
Then go
through the pair you just added.
Pick up
another two and do the same again. (Ladder stitch is really, really simple!)
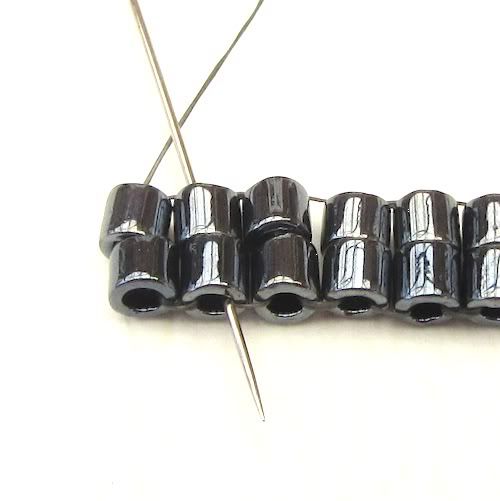
Keep going until the strip will fit your wrist. Then add another four or five
pairs because it shrinks a bit when you add the edging. But don’t worry, it’s
very easy to add more to the ends if you find it’s got a bit short…
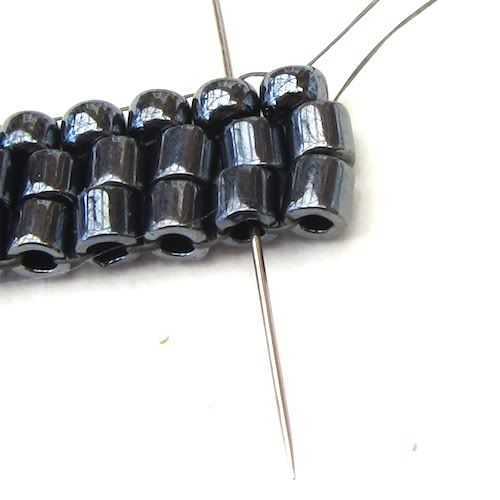
Now for the
brickstitch edging. Go through the last-but-one rung of your ladder so you’re
exiting the second bead from the end of the strip (sorry, this photo is upside
down for some reason).
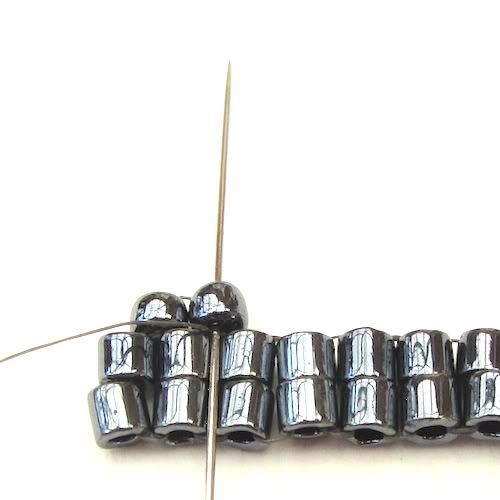
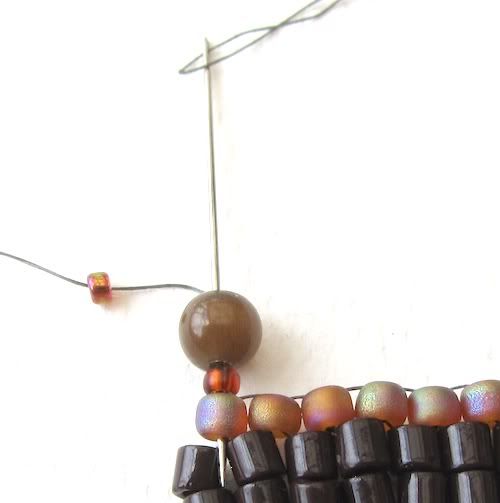
Pick up two
size 8 seed beads and pass your needle under the thread that connects the
second and third rungs.
Then go up
through the second of the seed beads you just added.
Pick up one
more seed bead and go under the thread that connects the third and fourth
rungs.
And back up
through the bead you just added.
Carry on
adding one seed bead to each thread bridge all along the strip. At the far end,
double back on yourself so you’re coming out of the second cylinder bead from
the end on the other side.
Flip the
strip over and work back along the other edge.
Now you’re
ready to add the embellishment – the fun part! It’s just simple fringing and
I’m sure you already know how to do that, but here’s a quick run-through again…
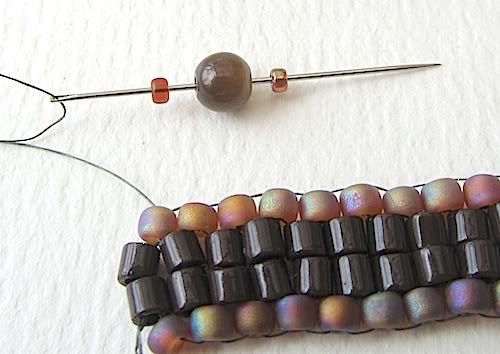
Exit the
first size 8 along the edge. Pick up a size 11 seed, an accent bead, another
size 11.
Go back
through the accent bead and first size 11 and carry on down through the size 8
bead you came out of.
Go up through
the next size 8 and add another fringe with a size 8 bead in place of the
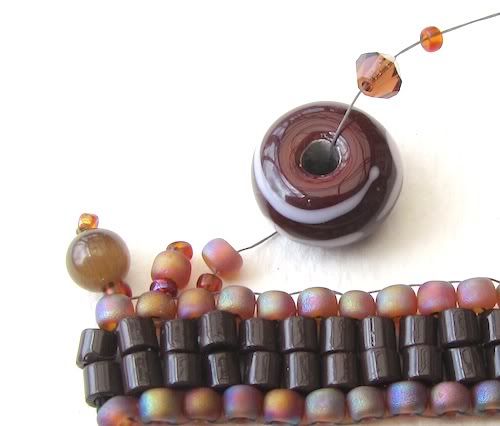
accent. Continue to alternate size 8’s and accents. When you add a lampwork
orphan, start the fringe with a size 11 and then a size 8 seed bead, then
string the orphan, a crystal bicone and a size 11. Go back down through
everything except the last size 11.
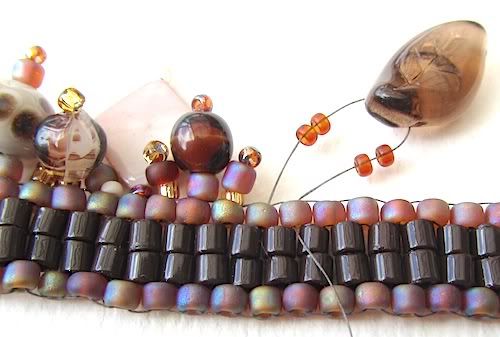
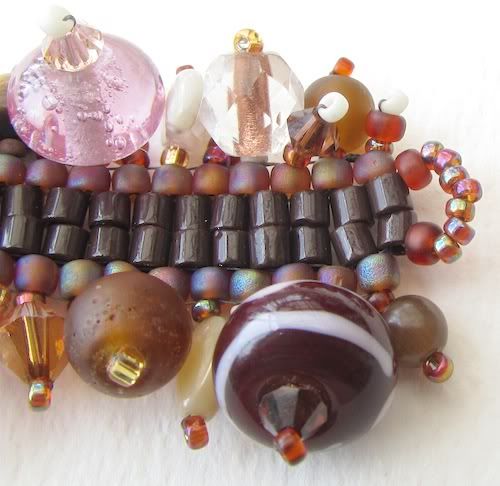
Keep going
all the way along both edges of the base strip, mixing and matching however you
like. If you have an accent bead with a transverse hole, add seed beads before
and after it, and if it’s wide (like this leaf) spread it over two edge beads.
When the
fringe is complete, add a loop of seed beads to the end of the cylinder bead
rows; go through it plenty of times to make it strong, then weave the thread
into the beadwork, knot and trim it.
Add a loop to
the other end in the same way, then use pliers and jump rings to connect the
clasp to the loop.
Wear and
Enjoy!
Happy
beading,
Lynn
Monday, 18 June 2012
Meet the team part 8
Today I want to show you some stunning lampwork beads created by FHFteam members that caught my eye today..........
Rita lives in market town in Somerset and has been working with glass and creating her beautiful ocean style focals for about 4 years now and has has been creating and selling her ceramic work for more than 20. I have chosen this beautiful lady to show you today but you will also find toppers and jewellery in Rita's wonderful Etsy store.
This beautiful hand shaped organic focal bead is totally luscious. Jane describes her working style wonderfully in her Etsy profile - Being spontaneous creatively is important to me. I rely heavily on my natural instinct and a piece is complete only when it feels "right".
I think this pretty BHB is absolutely gorgeous. Sandy writes - I love working with glass and I hope a little bit of me shines through ;-)
I hope you enjoyed this quick introduction, click the pics to go to Etsy and see more from each of our teamies and also don't forget to stop by and check out our June Giveaway blog post.
Rita of Avalon Designs
| Handmade Lampwork Goddess Yemaya |
Rita lives in market town in Somerset and has been working with glass and creating her beautiful ocean style focals for about 4 years now and has has been creating and selling her ceramic work for more than 20. I have chosen this beautiful lady to show you today but you will also find toppers and jewellery in Rita's wonderful Etsy store.
Jane of Jane Hamill
| Lampwork bead, "Sooleawa", art glass bead |
This beautiful hand shaped organic focal bead is totally luscious. Jane describes her working style wonderfully in her Etsy profile - Being spontaneous creatively is important to me. I rely heavily on my natural instinct and a piece is complete only when it feels "right".
Sandy of flowerjasper
| Jacobs Ladder, A silver core lampwork bead |
I think this pretty BHB is absolutely gorgeous. Sandy writes - I love working with glass and I hope a little bit of me shines through ;-)
I hope you enjoyed this quick introduction, click the pics to go to Etsy and see more from each of our teamies and also don't forget to stop by and check out our June Giveaway blog post.
Subscribe to:
Comments (Atom)


