
A regular spot from team member Lynn Davy, a self-confessed bead addict whose unusual designs often feature lampwork beads. Over the coming months you can learn some of her secrets and discover how to use FHFteam’s handmade beads and components in your own creations!
Tantalising Tassels:
I make a lot of necklaces that combine tiny seed beads with big chunky lampwork – I am drawn to the contrast between very big beads and very small ones.

And very often I finish them off with a tassel. I am a huge fan of tassels. They can be minimal, or lush; complementary, or contrasting.
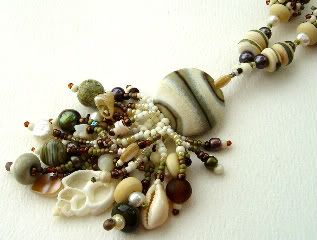
A beach-themed tassel – I don’t think I could have squeezed much more into this one
The question I am most often asked is: ‘How do you add a tassel underneath a focal bead?’
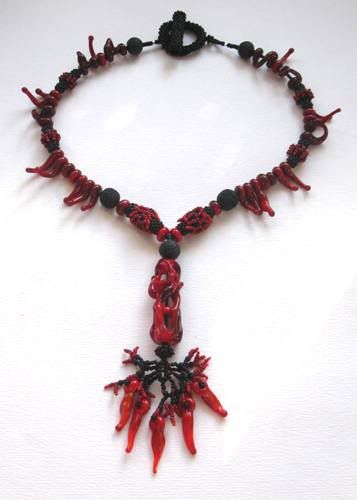
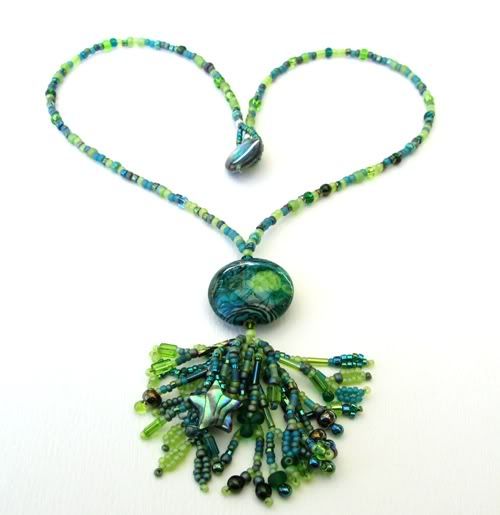
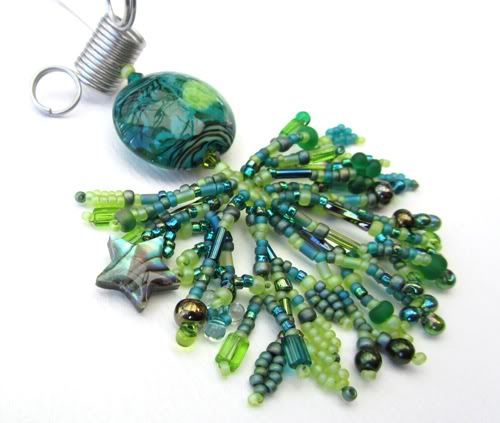
There are lots of ways of doing this, and here is mine. I’m going to walk you through making this ‘Gaia’ necklace – a tried and tested, simple but endlessly adaptable basic construction that you can then go on to use in your own designing. All of the other necklaces illustrated in this post are based on this structure.
You will need:
· A focal bead. This lentil one is by Jolene Wolfe (Kitzbitz Art Glass). Flattened shapes are best because they sit nicely against the skin when worn.
· Seed beads. The necklace is strung with size 8 seed beads and you will need some smaller size 11 beads for the tassel. You can also incorporate some bugle beads into the tassel if you like – these are the long thin ones that look like little tubes.
· Crystals. Two 4mm crystal bicones to stop your focal wobbling.
· Accent beads. The fun little bits and bobs that go on the ends of your tassel. Stick to smallish ones between about 4mm and 10mm. I included plenty of tiny 4mm ‘fringe drops’ and added a single bigger abalone shell star because it had stripes that matched the focal bead.
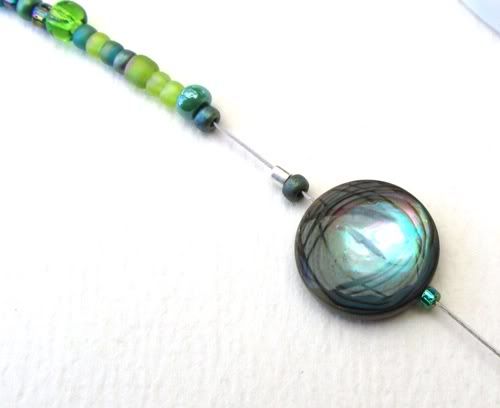
· Clasp bead. Lampwork spacers are ideal for this – choose something 12-15mm in diameter and not too spherical or it will slip out of the clasp loop. I used an abalone shell disc.
· Beading wire (also called tigertail or cable). I use the .018” 7-strand sort. It’s made of twisted wire with a plastic coating and is robust enough to take the weight of heavy beads without stretching or breaking.
· Nylon beading thread. There are lots of makes, and since you’ll be using it for the tassel, which isn’t particularly weight-bearing, it doesn’t matter which you choose. Nymo, C-Lon or K.O. are readily available from bead shops.
· Crimps. Don’t skimp on crimps. Plated metal ones are cheap but often brittle. I always use sterling silver, mainly 2mm x 2mm. You will need two for this necklace.
· Tools: beading needle (long and thin), sharp scissors, wire cutters, pliers or crimping pliers. And you will need something to keep the beads in place on the wire before you’ve crimped them: I use the ‘bead stoppers’ that look like little springs, but a bulldog clip or even a piece of sticky tape will do!
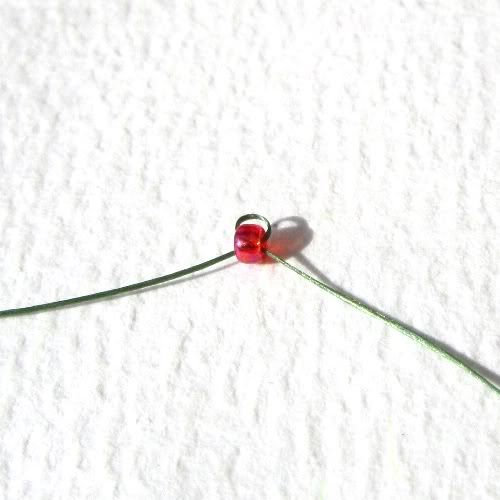
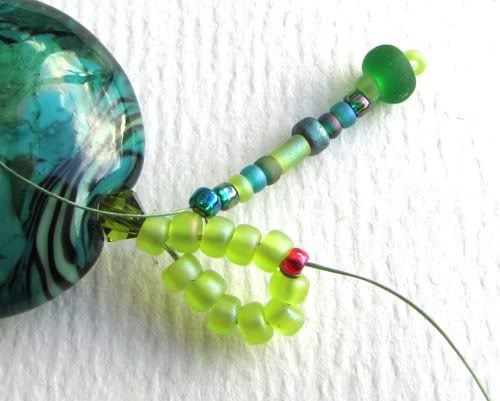
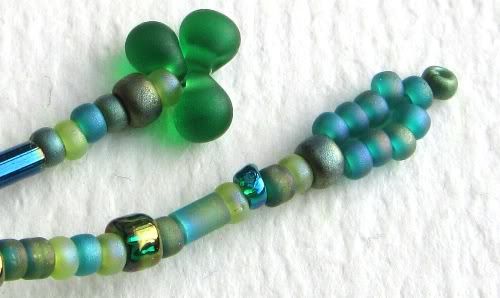
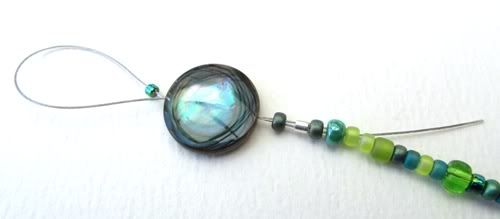
Cut a piece of beading wire a good 30cm longer than your preferred necklace length. String ten size 8 seed beads and slide them to the middle. Then take another size 8 bead and string it over both ends; slide it down so you have a loop.
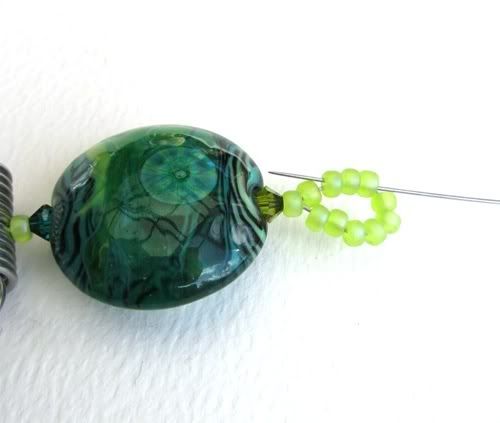
String a crystal, your focal, another crystal and a size 8 seed bead, all onto both ends of the wire. Slide them down to the loop. Don’t pull too tight at this stage. Put a bead stopper above the beads to keep them on the wire while you make the tassel.

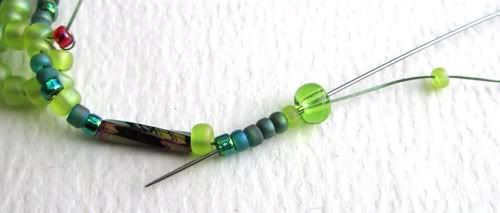
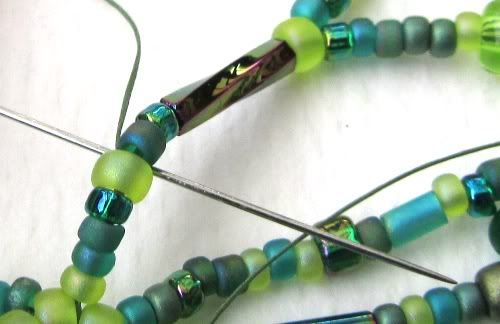
Thread your needle (no more than two arms’ length of thread) and tie a ‘stop bead’ on one end. It helps if it’s a contrasting colour. Use just a single knot, or go through the bead twice. You will need to be able to untie and remove it later.
Stitch through a couple of beads of the loop and emerge in the gap between the first and second bead. (You have ten beads in the loop, hence nine gaps.)
Pull the thread through until the stop bead catches it.
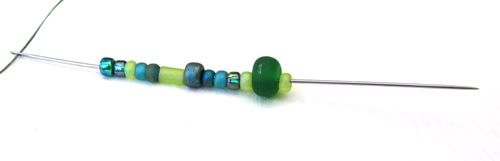
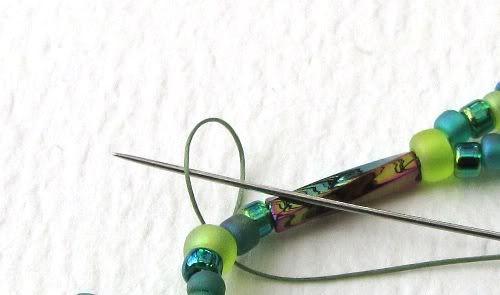
String your first tassel fringe. Say, 12 assorted size 11 beads, a size 8, and then an accent bead. Then add one more seed bead to be the ‘keeper’ that keeps the accent bead in place.
Pass back through all the beads except the ‘keeper’ and pull the thread snug but not tight – you want the fringe to hang nicely and not stick out rigidly.
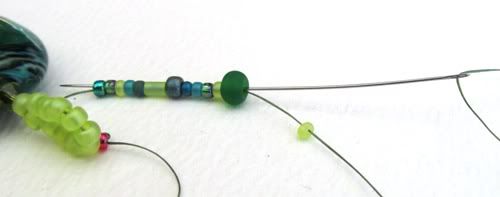
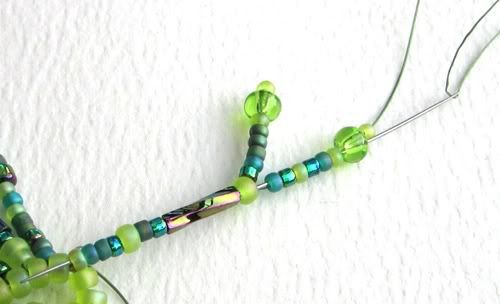
Stitch through the next bead in the loop.

Add another fringe, maybe 2 beads longer than the first.
A cluster of fringe drops makes a nice ending: string three drops and go back through the bead above them, making a tiny loop that sits like a clover leaf.

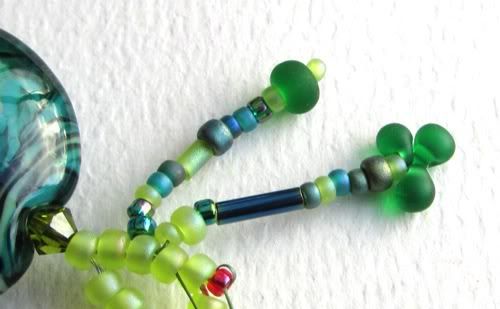
Keep increasing the length until you get to the fifth (central) fringe, then decrease for the next four fringes.
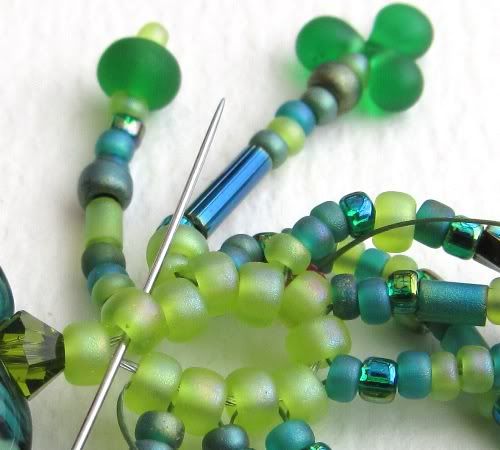
To make a leaf at the end of a fringe, string a size 8 bead and six size 11 beads, miss the last one and go back through the last-but-one. Pull snug. String another 4 size 11 beads and go back through the size 8 and the fringe.
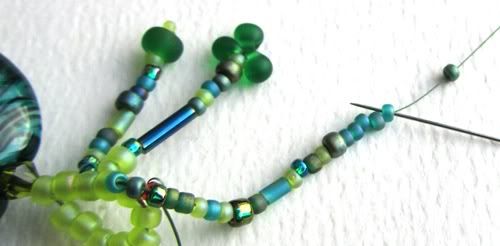
If you want a fringe to branch, don’t go back through all of it, but just partway: then add another short fringe before going back through the rest of it and on through the next loop bead.
When you get to the last fringe, stitch up through the tenth bead of the base loop and down through the first; then add a second round of fringing in exactly the same way. This will give you a nice full tassel. If you want it lusher, go round a third time.

Avoid tangling by holding the fringes you’ve already made in your non-working hand; and never pull the thread sharply in case it catches.
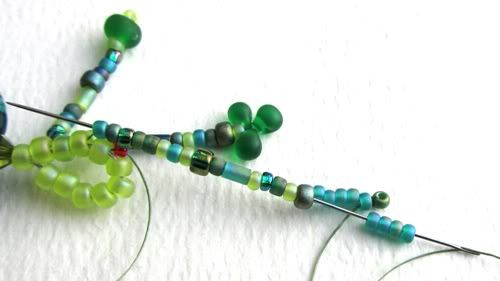
To finish off the thread, stitch through a few beads of the nearest fringe, go under the thread between two beads, and pull to make a small loop of thread.

Put your needle through the loop and pull the knot tight.
Make a second knot in the same place, weave through a few more beads and trim the end. Take the stop bead off the tail end of the thread and secure in the same way.
So now we have a tassel!
The rest of the necklace is easy peasy. Why didn’t we make the rest of the necklace first, you ask? Well… it’s surprising how much space the fringe threads can take up between the loop beads. And if you pull it all tight before you start, it can make it very difficult to fit your needle through, and it can all end up a bit too rigid. (This also applies if you are stitching fringe or spiral or anything else onto the foundation of the rest of the necklace. It’s always best to leave the crimping until last.)
Take the bead stopper off, and put it on just one end of the beading wire. String size 8 seed beads (or whatever beads you like) onto the other end until you’re just short of your desired necklace length, allowing room for the clasp.

Put the bead stopper onto the end with the beads and string the other side of the necklace. Check the length.

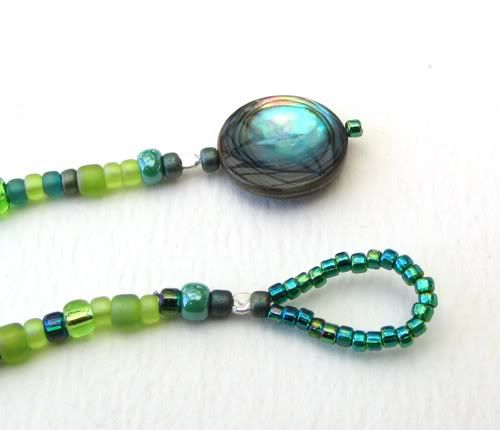
String a crimp, a size 8 bead, and the clasp bead. Add a single bead to be the ‘keeper’. Feed the end of the wire back through the clasp bead, the size 8 bead, the crimp and a couple more beads. Carefully (avoid kinking!) pull everything tight, making sure the focal bead is sitting snugly above the loop.
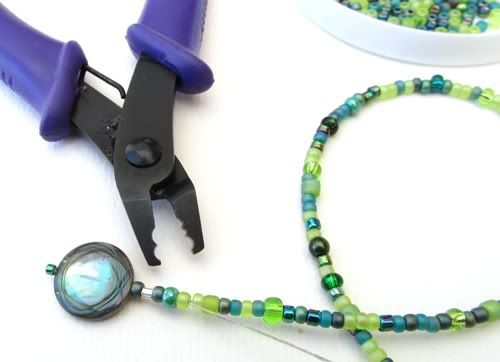
Now crush the crimp with whatever pliers you have to hand (these are 2-step crimping pliers). Take the loose end of the wire and pull hard to ensure there is no movement through the crimp. Trim the wire end.
Take off the bead stopper. String a crimp, enough size 11 beads to fit snugly around the clasp bead, and an extra size 8. Pass the end of the wire back through the first size 8 bead of the loop, then the crimp and a couple more beads. Pull until everything is snug (but still flexible) then crimp the crimp and trim the wire.
Cover your crimps with round crimp covers if you like.
See – that wasn’t so hard, was it?
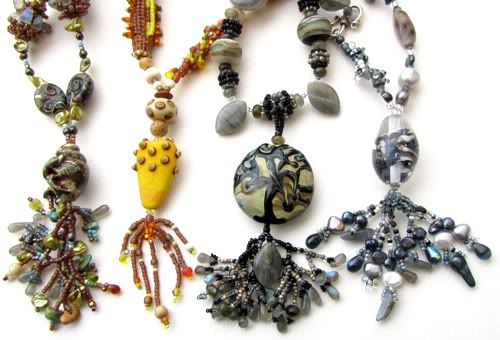
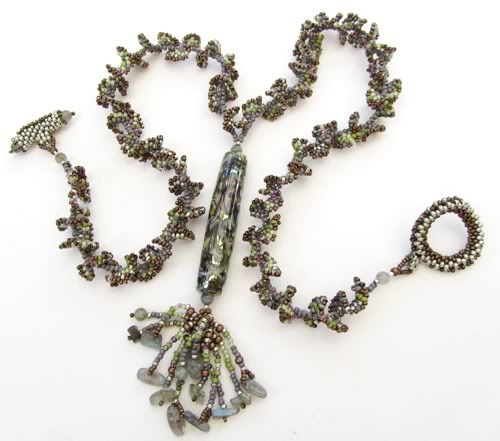
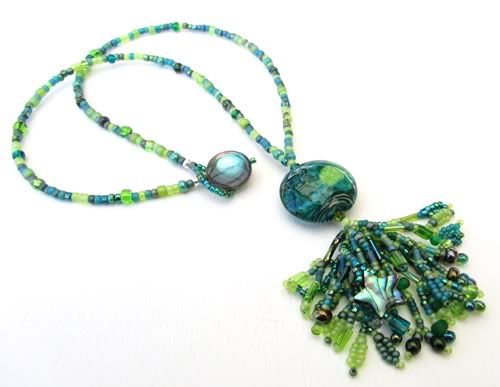
Four very different focals in four very different settings but all strung together and tasselled in the way you’ve just learned! L-R focals by: Tuffnell Glass, Emma Ralph, Billie Jean Little, Tan Grey.
---
Stay tuned for another edition of Lynn's Lampies next month!
8 comments:
Brilliant tutorial Lynn, lovely to see one of my beads all dressed up too! Jo x
A great tutorial, thanks for shaking your tassles at us Lynn !
Jo :)
Super tutorial Lynn, I can see Tassles being very popular for the 'C' Word. Thanks for sharing, Ruthx
Lovely tutorial,makes it look so simple to do, dazzling finished item. Must try this one!
Beautifully presented tut Lynn...it's very kind of you to share..;o)x
What a great tutorial! So easy to follow with lovely clear pictures. I can't wait to have a go.
Fab tutorial - will be rummaging through my stash of seedies and lampies tonight to have a go !
I had a go and am now the proud possessor of a PINK dangly Christmas tree decoration. I'm not the kind of person to wear tassels so I made a simple loop to hang it on the tree.
Thanks Lynn. It was an easy tutorial to follow and lovely photos that show the steps very clearly.
Post a Comment