Yvette Goodridge from Blue Kiln Beads is our interview subject this time, and she shares a bit about her inspiration, future hopes, and a lovely story of how she got started. Here we go...
1 - Your name: Yvette Goodridge
2 - Your shop name and address: Blue Kiln Beads, www.bluekilnbeads.blogspot.com www.bluekilnbeads.etsy.com
3 - Describe your artistic style in two words: Bright, eclectic.
4 - When did you first start glassworking and how did you get started?
My parents asked me what I wanted for my 30th birthday. I had discovered bead making classes but couldn’t afford to book one myself so it seemed like it would be a perfect gift. That was in 2006 with Beverley Hicklin, and the rest as they say is history. My mum is very creative and would admit to being a craft collector so ofcourse she wanted to come and now we both have our torches and share a kiln. Its great because I always have a friend to take to events like Flame Off.
5 - What do you love most about your craft?
I can have an idea and then create the beads to fit rather than having to search for the beads I need.
There is also the fact that there is always something new to learn whether its a technique, a design, the use of a different type of glass, its so exciting.
6 - If you could take a class with any artist (in your field or otherwise) who would you choose and why?
That's a tricky one because there are a few people I would like to have a class with. I think I would pick Dora Schubert, I love her designs and marvel at her stringer control.
7 - Do you have a favourite piece of your work that you can share with us?
I’m rather proud of the necklace I made to go with a top:
8 - Where do you find your inspiration?
I tend to start with a colour combination which might come from a piece of fabric or scrap book paper . I have two girls and some of their bits and bobs spark a colour combination. Some beads I made a while ago were inspired by one of their hairclips:
9 - What’s your favourite technique within your medium?
Tricky question for me because I like to dip in and out, if I see something in the Frithappens gallery or on a blog I decide to give it a go, so I don’t necessarily have a favourite technique. I am stuck on applying dots at the moment and trying to get them to go around the end of the bead evenly. I saw some Justin Tabor beads in a book recently and would love to be able to apply dots like he does.
10 - Where do you create your work?
In my utility space, its small but warm. Previously I was in my old garage which was a great space but chilly in winter.
11 - Do you have a favourite colour scheme or range when you’re creating pieces?
At the moment I am stuck on shades of green and purple, brown and blue are a favourite but I always come back to pinks and purples eventually.
12 - Can you give us a quotation/lyric/piece of advice that sums up your approach to life and your craft?
‘There are people who have money and people who are rich’ Coco Chanel. I think this sums up my personal situation at the moment and my craft. The breadwinner in our family has been looking for work for 8 months now and like many people my business is noticing the tightening of peoples’ purse strings but we feel we have family and friends and so feel rich. Hope that’s not too cheesy......
13 - The most serious question of all: if you could meet any fictional character, from TV film or literature, who would it be and why?
The way I’m feeling at the moment it would Mary Poppins. I could do with her advice on being organised and keeping all balls in the air at once with ease and elegance.
14 - Finally, what are your plans or hopes for your work in the future?
I would like to enter a few articles to magazines, build a thriving online presence and eventually get a craft unit where I can share my craft with others. My ultimate dream would be to own a craft centre where crafts people can share workshop space and the where the public can visit and buy and take lessons.
---
Thanks Yvette for the lovely pictures and answers!
Wednesday, 30 November 2011
Sunday, 27 November 2011
Lynn's Lampies - December
Lynn’s Lampies - Christmas Edition!
A regular spot from team member Lynn Davy, a self-confessed bead addict whose unusual designs often feature lampwork beads. In this series she shares some of her secrets and shows you how to use FHFteam’s handmade beads and components in your own creations!
All I Want For Christmas Is…
Yes, it’s that time of year again. And now that your family and friends all know that you make jewellery, they will be hoping – maybe even expecting – a unique and beautiful handmade gift from you this year.
You don’t want to disappoint them. But you’re so busy. How can you possibly make enough gifts in time?
Never fear – FHFteam is here. With all sorts of wonderful items that are perfect for turning into ‘instant’ gifts. All of the above can be put together in one happy evening, with very basic tools and techniques. And of course the team has plenty of ready-made presents even if you completely run out of beading time!
So where do we start? How about something very simple – what if you just want a tiny token present, or a stocking filler, or something for someone who doesn’t wear jewellery? And you’ve only got five minutes to make it?
Keyrings are my default answer to this. You learned a simple wire wrapping technique in my October blog post when we made earrings. A keyring is just the same as an earring, only a bit bigger and you only need to make one. One lovely chunky lampie, a headpin, couple of small beads, wrapped loop, keyring chain, pliers… sorted. It will take you longer to find the wrapping paper!
Mobile phone charms are also speedy to make, and can be attached to lots of things other than phones: pencil cases, for example, or zip pulls. If you have more time, you can add more dangles, perhaps spaced out on a short length of chain. This is an easy way to make bag charms, too.
Now, how about that rather delicious bead set you’ve been saving to give to someone special? But you haven’t done anything with it yet because designing just the right piece of jewellery is going to take you ages…
Actually, it’s going to take you half an hour. This bracelet is very simply strung onto beading wire and crimped together. The beads are a nice flattened shape and have so much detail in them, all they needed was a bit of copper in between. The design is slightly random and asymmetric, but since all the spacer beads are the same metal, it doesn’t matter.
Remember that big chunky beads like this will need smaller beads between them – not just to stop them wobbling about on the wire, but to give movement and flexibility. I’ve used 4mm copper filigrees, which sit nicely in the holes of the lampwork beads, and a mixture of ‘flower’ spacers and 2mm round beads to allow the bracelet to curve.
The finishing touch is a gorgeous etched copper toggle. Handmade findings are the perfect complement to handmade beads, and not only is copper a lovely warm colour, it’s considerably cheaper than sterling silver.
Always take care when fitting toggles – you need to be sure that there is enough room to pull the toggle through the loop, so put several small beads between the toggle and your first lampwork bead. Also make sure that there is a ‘break point’ somewhere in the piece – here, it’s the open jump ring that connects the clasp ring to the rest of the bracelet – so that if the jewellery gets caught in something, the breakpoint will give way before the wearer gets damaged!
Or if you don’t want a metal toggle – or the recipient has allergies – how about a button?
This metal-free bracelet is strung on C-Lon nylon cord (handy stuff that comes in all sorts of delicious colours; this is ‘ginger’). I strung a loop of size 6 seed beads big enough to fit over the button, then pushed these to the middle of my thread and knotted it.
A rummage in my stash box produced a handful of beads in toning colours. I strung alternating lampwork and seed beads onto the doubled thread, finishing with the button and knotting the cord ends securely underneath it. You can add a dab of glue to the knots for extra security.
Back to the copper now. I wanted a long necklace with a striking centrepiece, so I started with some hammered copper rings and spirals. I made a couple of little dangles with wrapped loops, found a glass heart that was just asking for a copper setting, and played around connecting them all together with jump rings until I was happy with the result.
I took a long length of brass chain and attached it to the top ring with a lark’s head knot (see the ribbon tutorial below). The spiral clasp was just too lovely to go at the back, so I attached it at one side of the necklace, near the front, where it can be both a functional clasp and an integral part of the design. (Again, it’s attached with open jump rings to provide a safety breakpoint.)
The copper spirals are also fabulous for earrings. Make wrapped loop dangles but use eyepinseyepin. Make sure they hang opposite ways round when the earrings are worn.
Focal beads, now. A search on Etsy for ‘fhfteam focal’ will bring up lots to choose from. And when you’ve done the shopping and your lovelies arrive, you sit and stroke them and wonder how you can make them look their best without spending hours and hours beading.
Well, sometimes less is more. How about a nice simple pendant… or three?
The flower pendant already has a built-in hanging loop, so all I needed to do here was to string it onto some beading wire and add alternating pearls and seed beads on either side.
I ran into a very common problem with this one. I love it so much I’ve decided to keep it… so now I need to find another present instead!
It’s finished off with crimps and a simple silver clasp. (Stringing and crimping were explained in last month’s blog post, by the way.)
Pendants also look good on chains, ribbons, or suede cord.
What if you have a focal bead without a loop, and want to turn it into a pendant? Well, you already know how to do that. Refer to my October earring tutorial again – a focal bead needs a longer wire or headpin, but the technique is exactly the same.
This pretty little necklace kit comes complete with handmade copper wire clasp and a hanging bail. It also comes with a neat coiled headpin: just add your focal bead and make a wrapped loop at the top. Don’t forget to attach the pendant to the bail BEFORE you do the final wrapping part! (Although if you do… just use a jump ring to connect them… nobody will notice.)
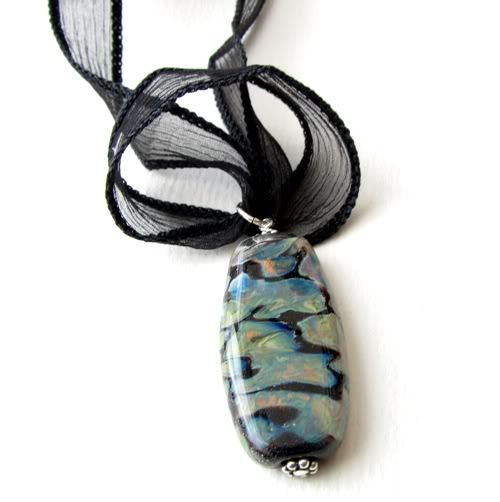
Ribbons are another lovely way to show off a very special focal bead. This month’s tutorial (below) will take you through making this pendant with its adjustable sliding clasp.
Tutorial: Ribbon pendant with sliding clasp
This is a handy technique for making an adjustable necklace with a length of ribbon or cord. It can be put together with no tools and is a really useful thing to know when you have to make a last-minute necklace for somebody and you’ve run out of clasps!
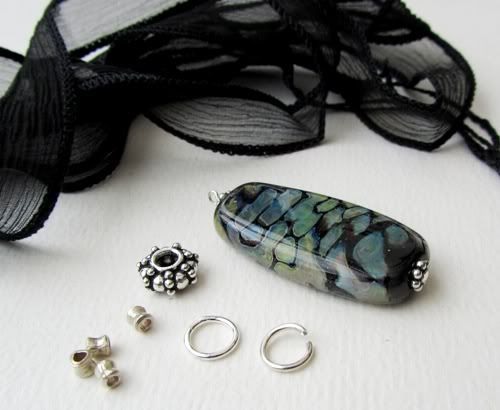
1. You will need:
· A pendant with a hanging loop or bail; or a lampwork focal bead made into a pendant with a wrapped loop (see October’s earring tutorial)
· One open jump ring
· One closed jump ring, at least 8mm diameter; or a hand-hammered silver or copper ring
· A length of silk ribbon (or organza, or alternatively cord or suede or leather…) long enough to go over your head with at least 30cm to spare
· One bead or ring to act as the clasp, with a hole big enough for the ribbon to go through twice
· A couple of small beads to finish off the ribbon ends (the handmade ribbon I used has two ‘tails’ of stitching at either end, so I needed four beads)
· Tools: flat-nosed pliers (two pairs if you have them), sharp scissors
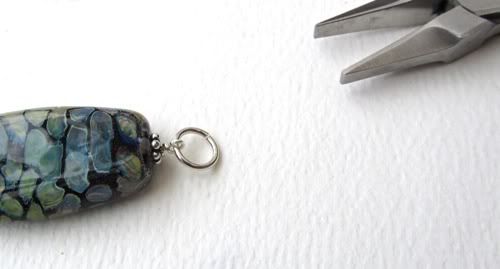
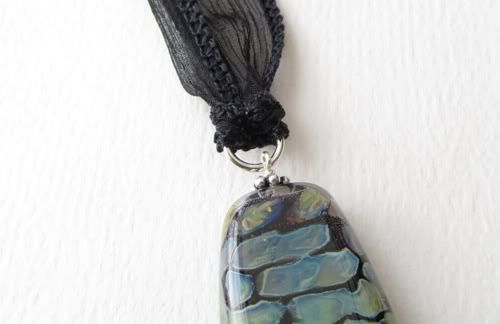
2. Use the pliers and the open jump ring to attach the closed jump ring to the top of the pendant.
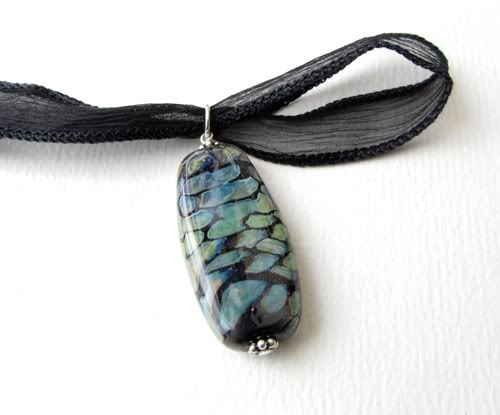
3. Fold the ribbon in half and feed the looped end through the closed ring.
4. Put the ends of the ribbon through the loop.
5. Pull the ends gently to make a neat ‘lark’s head’ knot around the ring.
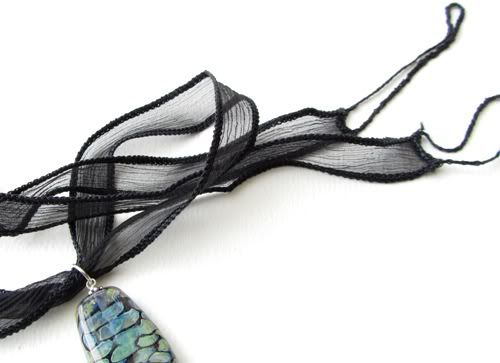
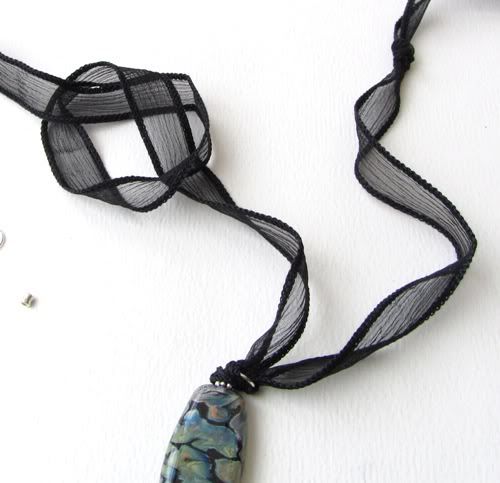
6. To prevent the necklace tightening too far, tie an overhand knot in the ribbon at either side. This will determine the shortest length at which the necklace can be worn. Make sure it’s big enough not to choke the wearer! If the hole in your clasp bead is very large, you may need to add a smaller bead above the knot to make sure it can’t be pulled through.
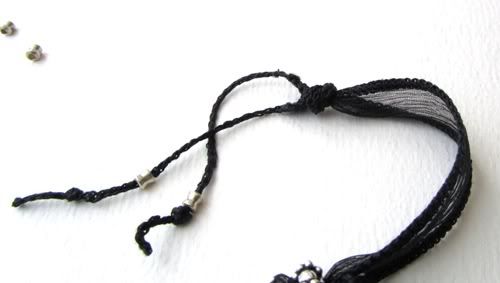
7. Thread one end of the ribbon through your clasp bead. Thread the other end through in the opposite direction, so that when you pull on the ends, the necklace shortens.
Add beads and/or knots to the ends of your ribbon so they can’t pull out of the clasp bead again. Trim the ends neatly.
Wishing you a happy and creative Christmas from all the FHFteam!
Members’ shops mentioned in this article:
Rachel Bishop http://www.etsy.com/shop/Puffafish
Diane Cook http://www.etsy.com/shop/dilunah for beads and http://www.dilunah.com/index.htm for findings
Glenn Godden http://www.etsy.com/shop/steampunkglass
Helen Gorick http://www.etsy.com/shop/helengbeads
Kathryn Greer http://www.etsy.com/shop/MyPrecious
Jane Hamill http://www.etsy.com/shop/janehamill
Julia Hay http://www.etsy.com/shop/Pandanimal
Scarlet Leonard http://www.etsy.com/shop/ScarletImpressions
Dianne Sandland http://www.etsy.com/shop/disandland
SowZeRe http://www.etsy.com/shop/SowZerE - unfortunately Diane is on vacation until the New Year, but sign up to be notified when she re-opens!
Heather Webb http://www.etsy.com/shop/BumpyBeads
Jolene Wolfe http://www.etsy.com/shop/KitzbitzArtBeads
A regular spot from team member Lynn Davy, a self-confessed bead addict whose unusual designs often feature lampwork beads. In this series she shares some of her secrets and shows you how to use FHFteam’s handmade beads and components in your own creations!
All I Want For Christmas Is…
Yes, it’s that time of year again. And now that your family and friends all know that you make jewellery, they will be hoping – maybe even expecting – a unique and beautiful handmade gift from you this year.
You don’t want to disappoint them. But you’re so busy. How can you possibly make enough gifts in time?
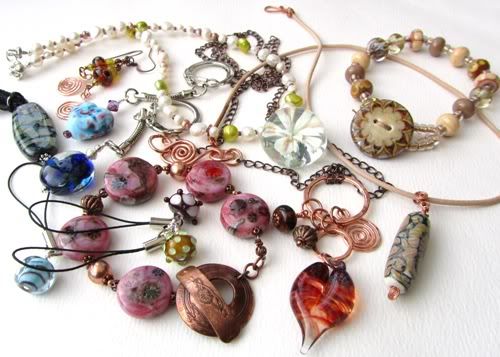 |
| I had a fabulous evening playing with my FHFteam goodies! |
Never fear – FHFteam is here. With all sorts of wonderful items that are perfect for turning into ‘instant’ gifts. All of the above can be put together in one happy evening, with very basic tools and techniques. And of course the team has plenty of ready-made presents even if you completely run out of beading time!
So where do we start? How about something very simple – what if you just want a tiny token present, or a stocking filler, or something for someone who doesn’t wear jewellery? And you’ve only got five minutes to make it?
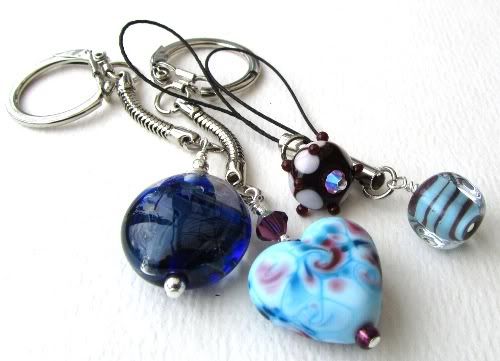 |
| Round focal by Heather Webb; heart by SowZeRe; phone charm beads by Kathryn Greer and Rachel Bishop |
Keyrings are my default answer to this. You learned a simple wire wrapping technique in my October blog post when we made earrings. A keyring is just the same as an earring, only a bit bigger and you only need to make one. One lovely chunky lampie, a headpin, couple of small beads, wrapped loop, keyring chain, pliers… sorted. It will take you longer to find the wrapping paper!
Mobile phone charms are also speedy to make, and can be attached to lots of things other than phones: pencil cases, for example, or zip pulls. If you have more time, you can add more dangles, perhaps spaced out on a short length of chain. This is an easy way to make bag charms, too.
Now, how about that rather delicious bead set you’ve been saving to give to someone special? But you haven’t done anything with it yet because designing just the right piece of jewellery is going to take you ages…
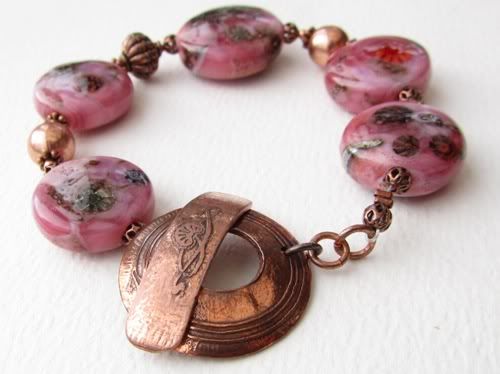 |
| Lampwork bead set by Jolene Wolfe; copper clasp by Di Sandland |
Actually, it’s going to take you half an hour. This bracelet is very simply strung onto beading wire and crimped together. The beads are a nice flattened shape and have so much detail in them, all they needed was a bit of copper in between. The design is slightly random and asymmetric, but since all the spacer beads are the same metal, it doesn’t matter.
Remember that big chunky beads like this will need smaller beads between them – not just to stop them wobbling about on the wire, but to give movement and flexibility. I’ve used 4mm copper filigrees, which sit nicely in the holes of the lampwork beads, and a mixture of ‘flower’ spacers and 2mm round beads to allow the bracelet to curve.
The finishing touch is a gorgeous etched copper toggle. Handmade findings are the perfect complement to handmade beads, and not only is copper a lovely warm colour, it’s considerably cheaper than sterling silver.
Always take care when fitting toggles – you need to be sure that there is enough room to pull the toggle through the loop, so put several small beads between the toggle and your first lampwork bead. Also make sure that there is a ‘break point’ somewhere in the piece – here, it’s the open jump ring that connects the clasp ring to the rest of the bracelet – so that if the jewellery gets caught in something, the breakpoint will give way before the wearer gets damaged!
Or if you don’t want a metal toggle – or the recipient has allergies – how about a button?
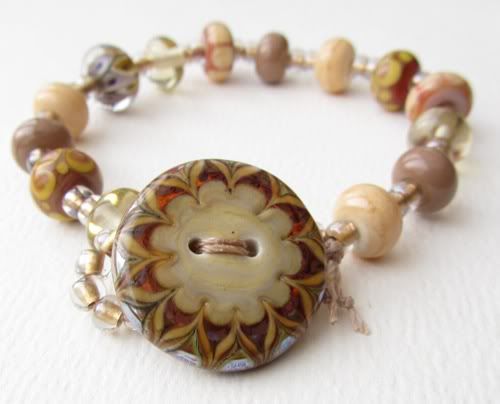 |
| Button by Helen Gorick; beads by various artists including Kathryn Greer and Julia Hay. (There’s no rule that says you can’t mix your beadmakers!) |
This metal-free bracelet is strung on C-Lon nylon cord (handy stuff that comes in all sorts of delicious colours; this is ‘ginger’). I strung a loop of size 6 seed beads big enough to fit over the button, then pushed these to the middle of my thread and knotted it.
A rummage in my stash box produced a handful of beads in toning colours. I strung alternating lampwork and seed beads onto the doubled thread, finishing with the button and knotting the cord ends securely underneath it. You can add a dab of glue to the knots for extra security.
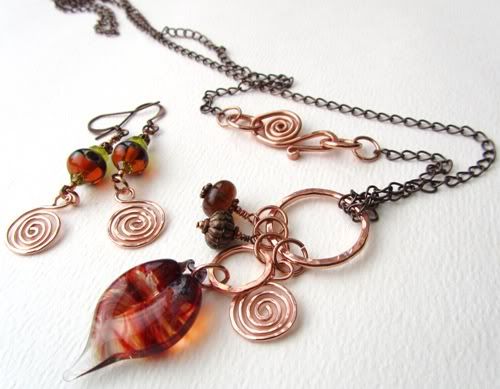 |
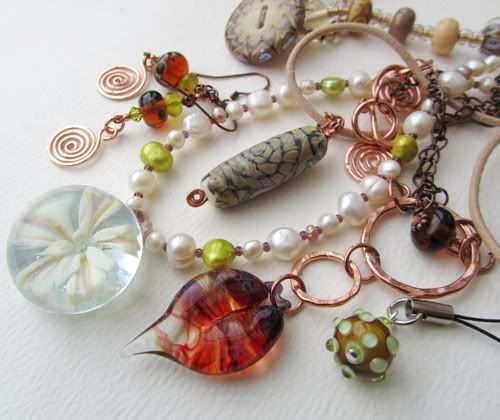
| Copper rings, spirals and clasp by Diane Cook; pendant by Glenn Godden; earring beads by Julia Hay |
Back to the copper now. I wanted a long necklace with a striking centrepiece, so I started with some hammered copper rings and spirals. I made a couple of little dangles with wrapped loops, found a glass heart that was just asking for a copper setting, and played around connecting them all together with jump rings until I was happy with the result.
I took a long length of brass chain and attached it to the top ring with a lark’s head knot (see the ribbon tutorial below). The spiral clasp was just too lovely to go at the back, so I attached it at one side of the necklace, near the front, where it can be both a functional clasp and an integral part of the design. (Again, it’s attached with open jump rings to provide a safety breakpoint.)
The copper spirals are also fabulous for earrings. Make wrapped loop dangles but use eyepinseyepin. Make sure they hang opposite ways round when the earrings are worn.
Focal beads, now. A search on Etsy for ‘fhfteam focal’ will bring up lots to choose from. And when you’ve done the shopping and your lovelies arrive, you sit and stroke them and wonder how you can make them look their best without spending hours and hours beading.
Well, sometimes less is more. How about a nice simple pendant… or three?
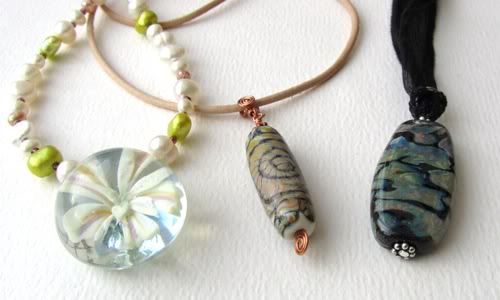 |
| Pendants make great gifts and are quick to assemble |
The flower pendant already has a built-in hanging loop, so all I needed to do here was to string it onto some beading wire and add alternating pearls and seed beads on either side.
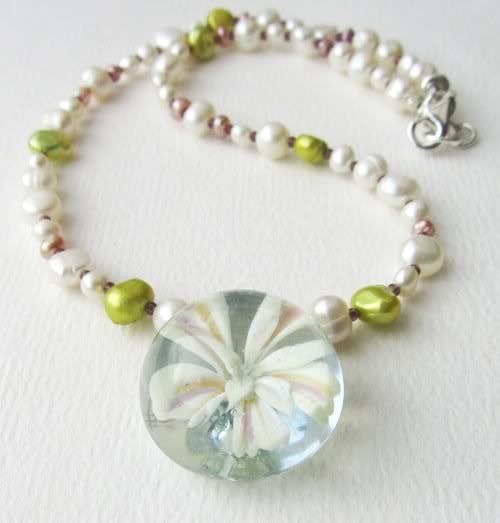 |
| Flower pendant by Glenn Godden. |
I ran into a very common problem with this one. I love it so much I’ve decided to keep it… so now I need to find another present instead!
It’s finished off with crimps and a simple silver clasp. (Stringing and crimping were explained in last month’s blog post, by the way.)
Pendants also look good on chains, ribbons, or suede cord.
What if you have a focal bead without a loop, and want to turn it into a pendant? Well, you already know how to do that. Refer to my October earring tutorial again – a focal bead needs a longer wire or headpin, but the technique is exactly the same.
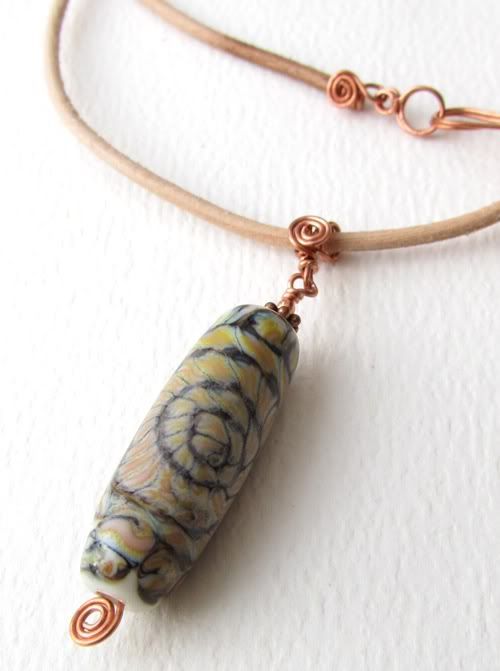 |
| Leather necklace by Scarlet Leonard; focal bead by Jane Hamill |
This pretty little necklace kit comes complete with handmade copper wire clasp and a hanging bail. It also comes with a neat coiled headpin: just add your focal bead and make a wrapped loop at the top. Don’t forget to attach the pendant to the bail BEFORE you do the final wrapping part! (Although if you do… just use a jump ring to connect them… nobody will notice.)
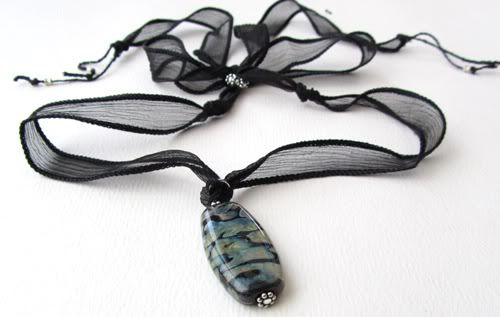 |
| Focal bead by Jane Hamill; handpainted silk ribbon by SowZeRe |
Ribbons are another lovely way to show off a very special focal bead. This month’s tutorial (below) will take you through making this pendant with its adjustable sliding clasp.
Tutorial: Ribbon pendant with sliding clasp
This is a handy technique for making an adjustable necklace with a length of ribbon or cord. It can be put together with no tools and is a really useful thing to know when you have to make a last-minute necklace for somebody and you’ve run out of clasps!
1. You will need:
· A pendant with a hanging loop or bail; or a lampwork focal bead made into a pendant with a wrapped loop (see October’s earring tutorial)
· One open jump ring
· One closed jump ring, at least 8mm diameter; or a hand-hammered silver or copper ring
· A length of silk ribbon (or organza, or alternatively cord or suede or leather…) long enough to go over your head with at least 30cm to spare
· One bead or ring to act as the clasp, with a hole big enough for the ribbon to go through twice
· A couple of small beads to finish off the ribbon ends (the handmade ribbon I used has two ‘tails’ of stitching at either end, so I needed four beads)
· Tools: flat-nosed pliers (two pairs if you have them), sharp scissors
2. Use the pliers and the open jump ring to attach the closed jump ring to the top of the pendant.
3. Fold the ribbon in half and feed the looped end through the closed ring.
4. Put the ends of the ribbon through the loop.
5. Pull the ends gently to make a neat ‘lark’s head’ knot around the ring.
6. To prevent the necklace tightening too far, tie an overhand knot in the ribbon at either side. This will determine the shortest length at which the necklace can be worn. Make sure it’s big enough not to choke the wearer! If the hole in your clasp bead is very large, you may need to add a smaller bead above the knot to make sure it can’t be pulled through.
7. Thread one end of the ribbon through your clasp bead. Thread the other end through in the opposite direction, so that when you pull on the ends, the necklace shortens.
Add beads and/or knots to the ends of your ribbon so they can’t pull out of the clasp bead again. Trim the ends neatly.
Wishing you a happy and creative Christmas from all the FHFteam!
Members’ shops mentioned in this article:
Rachel Bishop http://www.etsy.com/shop/Puffafish
Diane Cook http://www.etsy.com/shop/dilunah for beads and http://www.dilunah.com/index.htm for findings
Glenn Godden http://www.etsy.com/shop/steampunkglass
Helen Gorick http://www.etsy.com/shop/helengbeads
Kathryn Greer http://www.etsy.com/shop/MyPrecious
Jane Hamill http://www.etsy.com/shop/janehamill
Julia Hay http://www.etsy.com/shop/Pandanimal
Scarlet Leonard http://www.etsy.com/shop/ScarletImpressions
Dianne Sandland http://www.etsy.com/shop/disandland
SowZeRe http://www.etsy.com/shop/SowZerE - unfortunately Diane is on vacation until the New Year, but sign up to be notified when she re-opens!
Heather Webb http://www.etsy.com/shop/BumpyBeads
Jolene Wolfe http://www.etsy.com/shop/KitzbitzArtBeads
Saturday, 26 November 2011
Treasury round up 26/11
and lastly a fabulous twin team treasury fhfteam and tt team by Diane Cook
You can find beautiful beads, glass and more made by the talented members of FHFteam HERE
Saturday, 19 November 2011
Wednesday, 16 November 2011
FHFTeam giveaway prize - November
This giveaway is now closed - check the main blog for information about the new giveaway!
Good news - we have another giveaway for all our readers this month too! Lynn Davy has kindly offered an amazing Mojo Box as a prize for one lucky person, drawn from the names of all our blog followers who comment on the FHFTeam blog during the month of November.
Here's a peak at what you could win:
'One of Lynn Davy's unique 'Mojo Box' collections of beads - designed to
encourage and inspire you when your beading mojo goes missing! This one is
an FHFteam special in subtle earth tones with accents of copper and bronze
and contains a beautiful tab focal by Kathryn Greer, spacers by Karina
Thornhill, and an earring pair by Julia Hay, as well as two pairs of Diane Cook's handmade copper beadcaps and a selection of pressed glass, copper,
Swarovski crystal, freshwater pearl, shell and seed beads.
Check Lynn's Etsy shop for other colours... and
if you don't see what you want, she's always happy to put together a custom
selection!'
---
The winner will be drawn on the 5th of December, so start sharing your thoughts on the blog (and make sure you're subscribed to our blog), and you could win!
Good luck,
Hazel
Member Interrogations - Sue Harris
Welcome to another member interrogation, this time with Sue Harris -and it's filled with an obvious love of glass, and a special tip for how to get inspiration (hint: it involves chocolate). Read on...
1 - Your name: Sue Harris
2 - Your shop name and address: Blue Box Studio –
www.blueboxstudio.co.uk and http://www.etsy.com/shop/BlueBoxStudio
3 - Describe your artistic style in three words: Vibrant, colourful, quirky
4 - When did you first start glass work, and how did you get started?
I have worked with sea glass for a while but it’s getting harder to find. Some friends wanted to have a Taster Day with Georgina at Fireworks and needed someone to make up the numbers. Game for anything I joined in. I’m the only one of the 5 of us to have continued. Making my own glass beads seemed a natural progression for my jewellery.
5 - What do you love most about your craft?
The surprise element? I love the way my own beads mix beautifully with pieces of sea glass which I have drilled to use as beads, the way a murky brown rod of glass may just occasionally spring into life as a myriad of pinks and purples Of course it’s also lovely when something you have made is also ooh-ed and aah-ed over.
6 - If you could take a class with any artist (in your field or otherwise) who would you choose and why?
I’d love to incorporate my own buttons in my velvet scarves so would love to spend a day with Julie at Lush! I would love to be able to improve on my basic skills with George. I want to move onto the next ‘level’ and have Manda on my shortlist for this.
7 - Do you have a favourite piece of your work that you can share with us?
I discovered several large tab beads in ‘Dog Teeth Amethyst’. I’ve always loved amethyst – and purple so had to have these. I then gave myself the task of making a selection of purple beads to work with the stunning amethyst to make a necklace. I’m really pleased with the result and look forward to someone else loving it enough to give it a new home.
8 - Where do you find your inspiration?
Sometimes a combination of colours in my garden catches my eye, sometimes a picture or photograph inspires and from these images I’ll select the colours to work with. On days when inspiration deserts I’ll just take a selection of rods and work with those to see what effects I get – sometimes that is enough to kick start inspiration. If that doesn’t work, I sort through my bead box and eat chocolate!!
9 - What’s your favourite technique within your medium?
I’m ‘into’ frit at the moment. I have rather a lot of it.
10 - Where do you create your work?
I’m lucky to have 2 garden studios. One, the original Blue Box Studio (not too hard to work out why) was always my jewellery studio. It’s now my lampwork and drilling sea glass studio. I also have a larger studio for textile work, making jewellery, photography and anything else I can’t sneak into the house on a take-over bid.
11 - Do you have a favourite colour scheme or range when you’re creating pieces?
With lampwork glass it would have to be purple, or Nyx or Triton if using Double Helix (although Pandora is coming up the outside as a favourite). With sea glass, I love working with End of Day sea glass (the multi-coloured pieces that result from work made at the end of the day in the glass workers own time).
12 - Can you give us a quotation/lyric/piece of advice that sums up your approach to life and your craft?
Always do the thing you don’t want to do first. I also like ‘A woman is like a tea bag- you never know how strong she is until she gets in hot water’. [Eleanor Roosevelt] – I tested this one in 2002, and it’s true for me.
13 - The most serious question of all: if you could meet any fictional character, from TV film or literature, who would it be and why?
I’d like to meet an estate agent (there must be one) from Midsomer [Murders] county, to find out how he dismisses the incredibly high murder rate to potential incomers. You could hardly advertise the area as having a low crime rate, although 100% of the crimes do seem to be solved.
14 - Finally, what are your plans or hopes for your work in the future?
Working with glass is only one of my crafts, I also work with silks and velvets to make scarves and accessories. I’m a realist and know I will never make my fortune at this, but hopeful enough that I will be able to return to full time self-employment in the next few years and be able to leave The Daily Grind. In the short term, I am hoping to spend the first couple of months in the New Year to concentrate on my lampwork and put the hours in to PPP (practice, practice, practice). Then I feel I can justify taking more courses and furthering my skills.
FHFTeam Design Process
Another great new feature, giving an insight into the design processes of our team members, written by Helen Chalmers of Helen Jewellery. Take it away, Helen...
---
You may have wondered before how some of the FHFTeam members come up with ideas for the lovely pieces they produce. This little feature will highlight the work of some of the team over the next few months, explaining the inspiration and thoughts behind the work they produce.
My work is mainly inspired by the urban environment around me, especially quiet places within the city that not many people know about. I find glass an ideal medium to express this in, due to its fragility, and possibilities for organic appearance.
I usually start with taking photographs, spending an hour with my camera in a special place can lead to a whole line of inspiration.
Sometimes I can just pick out colours and patterns and hop straight on the torch and see what happens, but usually I like to take some time to draw so I can consider shape, colours, texture, and have a reference in front of me at the torch. These drawings were done from photographs and sketches I took on a trip to Greyfriars in Edinburgh.
The final part process is heading to the torch, and using glass as a tool to express the visuals and atmosphere. Sometimes I go on and make jewellery with it, sometimes I am thrilled to see other people create wearable products with my work.
Here are some pieces that have resulted from this design process.
Thanks for reading this, I hope you enjoyed it! Another (probably very different!) way of designing for a FHFteam member will be published next month! :)
Monday, 14 November 2011
Pick of the Month in November
| Winter Fairytale Handmade Lampwork Pendant from Princess Peggy |
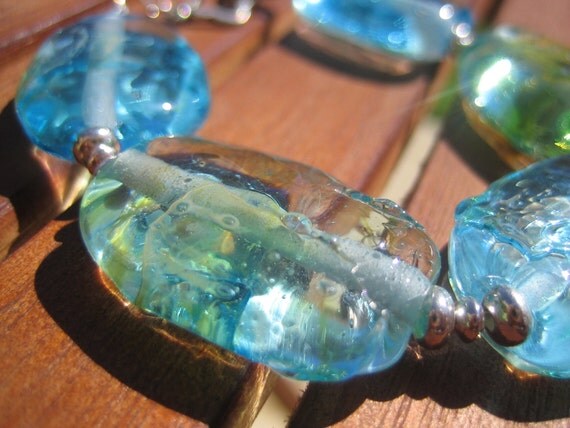 |
| Tide Pools Lampwork Glass Bracelet from puffafish |
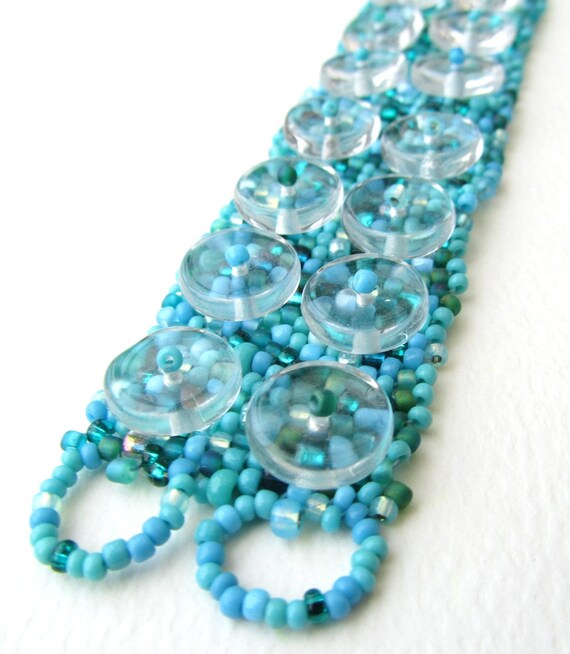 |
| River Cuff - Original Blue from nemeton |
| Teal Time - Handmade Lampwork Bead Set from GaysieMay |
 |
| Seafoam from Gallowaybeads |
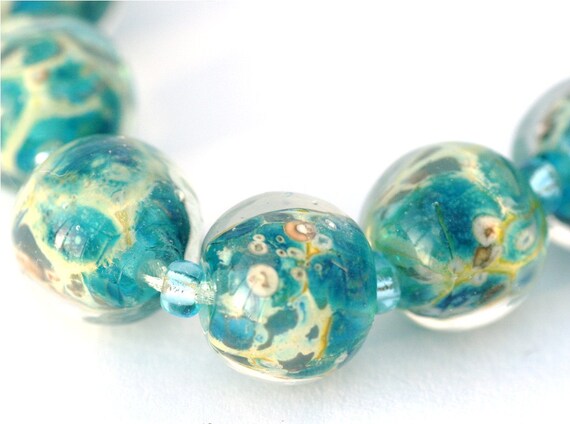
Beautiful teal and aqua from FHFteam
Saturday, 12 November 2011
Thursday, 10 November 2011
Etsy Tips - List Often, by Jane Hamill
An occasional feature from Jane Hamill, who shares her experiences with selling on Etsy, and how she uses it to its best advantage.

Keeping your visibility on Etsy is important. You want your items to appear regularly on the recent items lists and in your favourites' and circles' activity pages. Obviously you can't make enough of your craft to be able to be constantly listing new things but you should have an aim.
That aim is to list one item per day.
I know what you're going to say; there's no way you can make enough of your high-quality handmade items to be able to list one a day without burning yourself out! Yes, I agree - the only way I was able to do this right from the beginning was because I had a huge backlog of stock that I was moving from my own webshop across to Etsy. I moved one per day whilst I still continued to make beads and jewellery, creating a further queue of items.
I'm also lucky that my chosen art, lampworked glass beads, enables me to create at least one high-quality saleable focal or set per torch session. In fact there are usually more than that and when my health allows, I have one torching session, three days per week.
If you're creating bigger items that take a great deal more time to make, the one-per-day rule is tricky to stick to, if not impossible.
The best advice I can give is to at least *aim* for one-per-day. Sometimes you might find yourself with a few items to list, so don't be tempted to do so all at once, eke them out over the next few days, one a day.
Etsy recently introduced the "Draft listings" option, where you can type up your description, upload pictures, set your tags (try to use all the slots for pictures and all of your 14 allocated tags where you can!) and then save it as a draft to activate at a later date. This means you can set aside some time at the computer to get all the listing done and once and all you have to do for the next few days is to activate each one.
And of course, whilst you're working through this queue you will also be making new things to add to the end of it... and so on...
Remember also, renewed items count as a newly-listed item. Obviously we're hoping that you will sell your work before its listing expires but if it doesn't you can at least use it to your advantage :) Don't renew your items all at once; again, eke them out.
Once you have built up some momentum with this you'll find it easier over time to approach, if not reach, listing one item per day - good luck! :)
Sunday, 6 November 2011
Wednesday, 2 November 2011
Earrings Giveaway Winner!
All the names of our readers who commented throughout the month have been collected, and a random name has been drawn....
So...
the winner of Lynn's lovely lampwork earrings is Shaiha! Congratulations Shaiha: Lynn will be contacting you to get your details
Here's a picture of the prize:
As a side note, I want to thank everyone who commented, and continues to comment on the blog; every comment is truly appreciated.
So...
the winner of Lynn's lovely lampwork earrings is Shaiha! Congratulations Shaiha: Lynn will be contacting you to get your details
Here's a picture of the prize:
As a side note, I want to thank everyone who commented, and continues to comment on the blog; every comment is truly appreciated.
Member Interrogations - Helen Wyatt
This time, lampworker Helen Wyatt shares her thoughts on glass, life, and The Flumps. Read on...
1 - Your name: Helen Wyatt
2 - Your shop name and address: Alchemy Lampwork - www.etsy.com/shop/alchemylampworkUK
3 - Describe your artistic style in three words: A right mismash!
4 - When did you first start glass work, and how did you get started?
I took a one day introductory course with Beverley Hicklin in September 2008 and was immediately entranced and knew I just had to start learning to make beads myself. Since then, there's been no looking back!
5 - What do you love most about your craft?
The fact that it's difficult. I get bored easily, and tend to lose interest in anything once I feel I've "mastered" it. As it's unlikely I'll "master" lampwork anytime soon, it's the perfect craft for me!
6 - If you could take a class with any artist (in your field or otherwise) who would you choose and why?
I would love to take a class with Melanie Moertel as I love her incredible combination of bright colours and stringer work.
7 - Do you have a favourite piece of your work that you can share with us?
My work is ever changing and so is my favourite, but at the present time I'm quite fond of these beads
8 - Where do you find your inspiration?
I often don't! I am one of those people who can quite regularly just sit looking at my glass stash thinking "what the hell am I going to make with that then?"! But if I sit there long enough, something normally comes to mind. If I'm really stuck, I'll just pick a few colours at random and set myself the challenge of making something with them!
9 - What’s your favourite technique within your medium?
Stringer work - I find it really therapeutic to work with super fine pieces of glass and attempt to make them behave in the flame. Of course, that's until it all goes horribly wrong, when I'm usually to be found swearing loudly and if asked, I'd deny it was therapeutic at all!
10 - Where do you create your work?
On a 3ft x 2ft converted computer table at the end of my bed, in my bedroom! I live in a small flat, so there's no other choice. I'd like to think I can show beginners that it really is possible to create anywhere, if you have the will to do it!
11 - Do you have a favourite colour scheme or range when you’re creating pieces?
I love purple and pinks, so tend to be drawn to them. However, I try to push myself out of my comfort zone by working with greens occasionally, as they really aren't my thing!
12 - Can you give us a quotation/lyric/piece of advice that sums up your approach to life and your craft?
Probably the lyric "This is the closest thing to crazy I have ever been" by Katie Melua! My relationship with glass normally teeters somewhere in the region of a love/hate affair, depending on how its going on the day in question - and it frequently makes me want to go "ARRRRRRRRRRRRRRRRRRRRGHGHHHHH!"
13 - The most serious question of all: if you could meet any fictional character, from TV film or literature, who would it be and why?
Pootle Flump from The Flumps. Any person that could make an arran knitted beanie hat look that cool has got to be worth meeting.
14 - Finally, what are your plans or hopes for your work in the future?
I just want to keep improving! Recently I've been feeling a bit stuck in a rut, and I'm hoping I'll break through it soon!
-----
Thank to Helen for such a fun read - and don't forget to watch out for the next member interrogation!
Hazel
Subscribe to:
Comments (Atom)


